
Are you planning to install fascia boards for your roof trim? If so, you might be wondering what size nails you should use. Choosing the right nail size is essential to ensure your fascia boards are securely attached to the roof’s rafters. But with so many nail sizes available in the market, it can be confusing to determine which one is the best fit for your project.
So what’s the bottom line – what size nails should you use for fascia board?
For attaching fascia boards, the ideal nail size typically depends on the thickness and type of material being used. Generally, 8d (2 1/2-inch) galvanized or stainless steel nails are recommended as they provide ample penetration into the rafter or joist, without protruding through the back of the fascia. Selecting the right nail size ensures that the fascia board is securely fastened and resistant to weather conditions, making it vital to consult manufacturer guidelines or professional recommendations for specific materials.
In my experience, selecting the correct nail size for fascia boards depends on various factors, such as the thickness of the fascia board, the length of the nail, and the type of material your roof is made of. Using nails that are too short or too long can lead to improper installation, which can cause the fascia board to loosen or even fall off. On the other hand, using nails that are too thick can split the fascia board, while using nails that are too thin can cause the board to warp or bend over time.
To help you choose the right nail size for your fascia board installation project, we’ve compiled some essential information you need to know. In the following sections, we’ll discuss the different nail sizes you can use for fascia boards, the factors to consider when choosing the right size, and tips on how to properly install fascia boards using nails. So, keep reading to learn more!
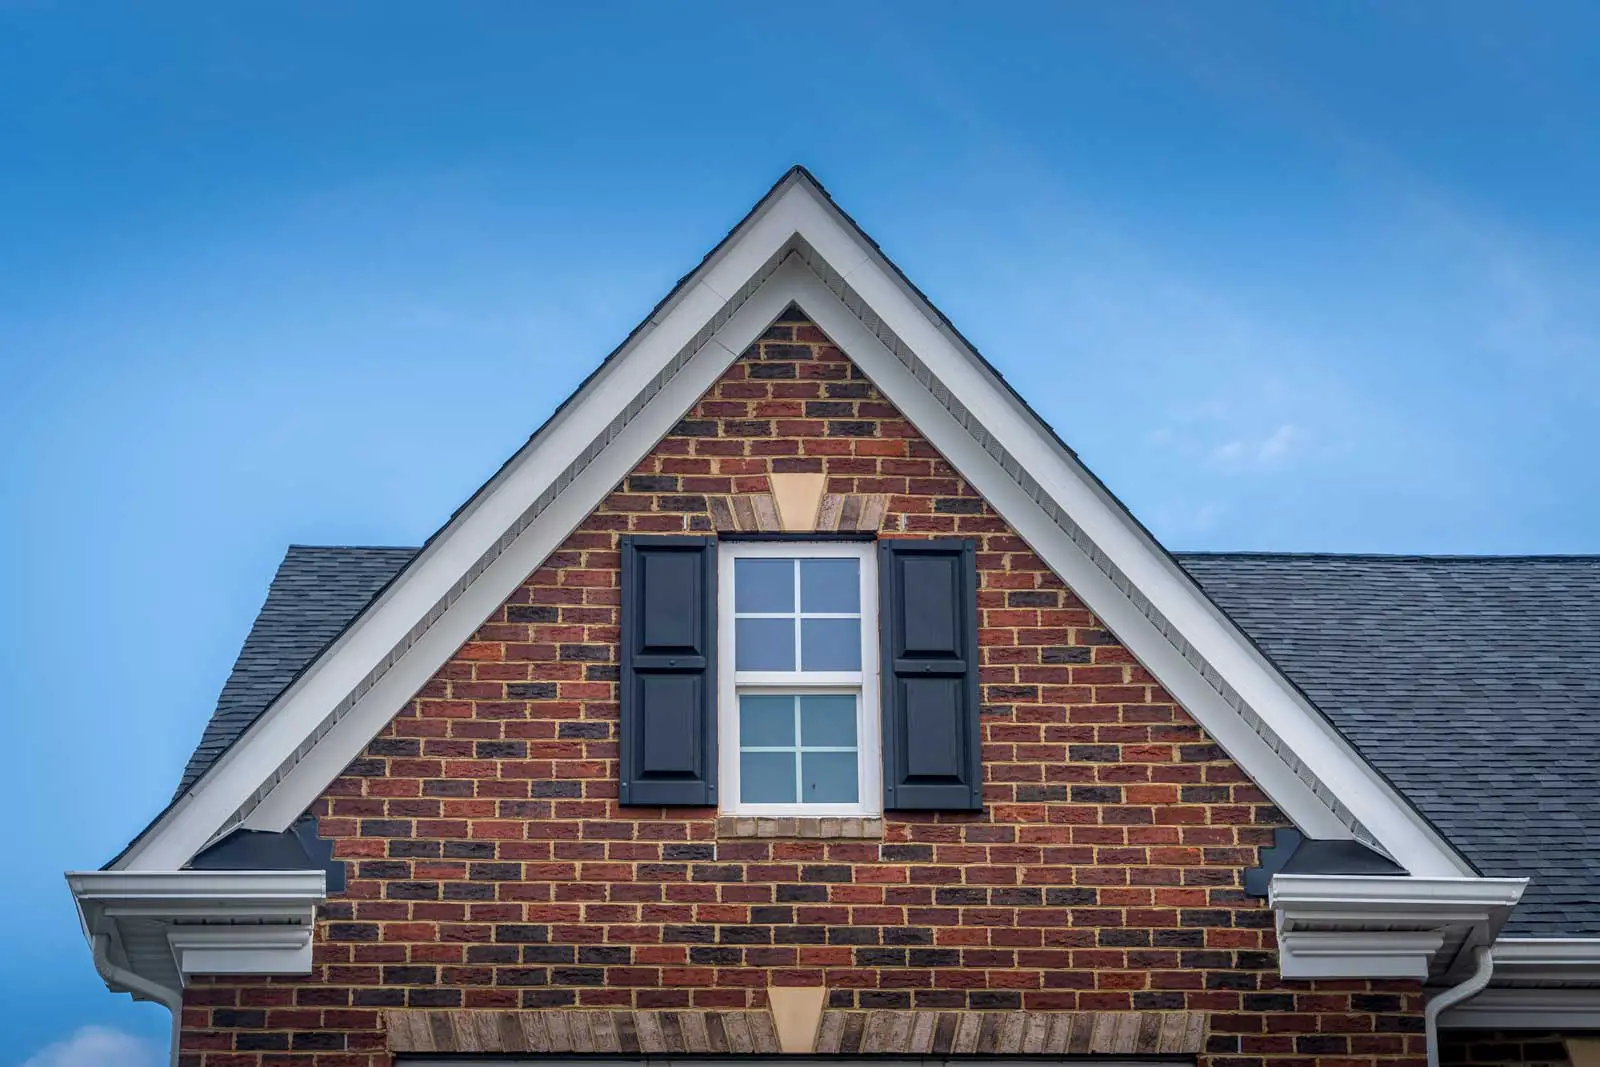
Understanding Fascia Boards
If you’re planning to install a new fascia board, it’s important to choose the right size nails to ensure a secure and long-lasting installation. But before we dive into nail sizes, let’s first understand what fascia boards are and their importance.
In my experience, fascia boards are an essential component of any roofing system. They are the horizontal boards that run along the roofline, connecting the roof to the outer walls of a building. Fascia boards serve several purposes, including protecting the roof and walls from water damage, providing a finished look to the roofline, and supporting the gutter system.
When it comes to choosing the right material for your fascia board, there are several options available, including wood, aluminum, composite, vinyl, and PVC. Each material has its own set of pros and cons, so it’s important to weigh them carefully before making a decision.
Wood Fascia Boards
Wood fascia boards are a popular choice due to their natural look and affordability. They are typically made from fir, pine, spruce, or cedar and are available in a variety of sizes and finishes. However, wood fascia boards require regular maintenance and are prone to rot and decay if not properly treated and sealed.
Composite Fascia Boards
Composite fascia boards are made from a combination of wood fibers and plastic materials. They offer the natural look of wood without the maintenance and are resistant to rot, decay, and insect damage. Composite fascia boards are available in a variety of colors and finishes, making them a popular choice for homeowners looking for a low-maintenance option.
PVC Fascia Boards
PVC fascia boards are made from a durable plastic material that is resistant to moisture, rot, and decay. They are available in a variety of colors and finishes and require little to no maintenance. PVC fascia boards are a popular choice for homeowners looking for a long-lasting, low-maintenance option.
When it comes to nail sizes for fascia boards, it’s important to choose the right size to ensure a secure installation. The size of the nail will depend on the thickness of the fascia board and the material it’s made from. In general, a 2-inch nail is suitable for most fascia board installations. However, if you’re using a thicker board or a denser material like composite or PVC, you may need to use a longer nail.
In conclusion, choosing the right size nail for your fascia board is crucial to ensure a secure and long-lasting installation. Understanding the different materials available and their pros and cons can help you make an informed decision when it comes to choosing the right fascia board for your home.
The Importance of Correct Nail Size
When it comes to installing fascia boards, choosing the correct nail size is crucial. Using the wrong size nail can lead to a range of problems, from the board not being securely attached to the house to the nail breaking or bending during installation. In this section, we’ll explore the importance of using the right nail size for fascia board installation.
The Right Nail Size
Choosing the right nail size for fascia board installation is essential. The size of the nail you choose will depend on the size of the board you’re installing, as well as the type of nail you’re using. In general, you’ll want to use a nail that is long enough to penetrate through the fascia board and into the rafter or truss behind it.
Galvanized Casing Nails
Galvanized casing nails are a popular choice for fascia board installation. These nails are made from galvanized steel, which makes them resistant to rust and corrosion. They are also strong and durable, which means they can hold up to the weight of the fascia board without bending or breaking.
Finishing Nails
Finishing nails are another option for fascia board installation. These nails are smaller than galvanized casing nails and are designed to be used for finishing work. While they may be suitable for smaller fascia boards, they are not recommended for larger boards as they may not be strong enough to hold the weight of the board.
My Experience
In my experience, using the correct nail size for fascia board installation is critical. I’ve seen firsthand what can happen when the wrong size nail is used. Boards can come loose, and nails can break or bend, leading to costly repairs. By taking the time to choose the right nail size, you can ensure that your fascia board installation is secure and long-lasting.
Conclusion
Choosing the correct nail size for fascia board installation is essential for ensuring that your boards are secure and long-lasting. Whether you choose galvanized casing nails or finishing nails, be sure to select the right size for the job. By doing so, you’ll avoid costly repairs and ensure that your fascia board installation is a success.
Choosing the Right Materials
Are you looking for the perfect materials for your fascia board? Choosing the right materials is critical to ensure the longevity and durability of your fascia board. With so many options available, it can be challenging to determine which material is the best fit for your needs. In this section, we’ll explore the various materials available for fascia boards and discuss their pros and cons.
Aluminum Fascia
Aluminum fascia boards are a popular choice due to their durability and low maintenance requirements. They are resistant to water, insects, and fire, making them an excellent option for areas with harsh weather conditions. Additionally, aluminum fascia boards come in a wide range of colors, allowing you to match them with your home’s exterior.
Plastic and Composite Fascia
Plastic and composite fascia boards are an affordable and low-maintenance option. They are resistant to water and insects and come in a variety of colors and styles. However, they may not be as durable as other materials, and they may fade over time.
Vinyl and PVC Fascia
Vinyl and PVC fascia boards are a popular choice due to their low maintenance requirements and durability. They are resistant to water, insects, and fire, making them an excellent option for areas with harsh weather conditions. Additionally, vinyl and PVC fascia boards come in a wide range of colors, allowing you to match them with your home’s exterior.
Wood Fascia
Wood fascia boards are a classic option that can add a touch of elegance to your home’s exterior. They come in a variety of styles, including redwood, which is a popular choice due to its durability and resistance to rot and insects. However, wood fascia boards require regular maintenance, and they may not be as durable as other materials.
In my experience, choosing the right materials for your fascia board is critical to ensure its longevity and durability. By considering the pros and cons of each material, you can make an informed decision that meets your needs and budget.
What Size Nails for Fascia Board: Installation Process
Are you planning to install a new fascia board on your roof eaves? Well, you need to ensure that you choose the right nail size to secure it in place. The installation process may seem daunting, but with the right tools and techniques, you can complete the job with ease. In this section, we’ll go over the installation process for a fascia board and the nail size you should use.
Choosing the Right Nail Size
Before you start the installation process, you need to choose the right nail size. The size of the nail will depend on the thickness of the fascia board and the rafter. In general, you should use 8d or 10d nails for a fascia board. These nails are 2.5 inches or 3 inches long and have a diameter of 0.131 inches.
In my experience, it’s best to use a nail gun to install the nails. This will ensure that the nails are driven in straight and at the right depth. You can also use a hammer and nails, but this will take longer and require more effort.
Installation Process
Now that you have the right nail size, you can start the installation process. Here’s a step-by-step guide:
- Cut the fascia board to the correct length using a circular saw or miter saw.
- Place the fascia board against the eave and nail-lock joint.
- Use a nail gun or hammer to secure the fascia board in place.
- Make sure to space the nails every 12 to 16 inches along the rafter.
- Countersink the nails to ensure that they are flush with the surface of the fascia board.
It’s important to note that the installation process may vary depending on the type of roof you have. If you’re unsure about the installation process, it’s best to consult a professional carpenter.
Conclusion
Installing a fascia board may seem like a daunting task, but it’s actually quite simple. By choosing the right nail size and following the installation process, you can ensure that your fascia board is secure and looks great. Remember to space the nails correctly and countersink them to ensure a professional finish.
Maintaining Your Fascia Board: Tips and Tricks
You may not think about your fascia board often, but it is an essential part of your home’s exterior. It protects your roof and home from water damage and other elements. However, like anything else, it requires maintenance to keep it in good condition. In this section, we’ll cover some tips and tricks to help you maintain your fascia board.
Paint or Stain Your Fascia Board
One of the most important things you can do to maintain your fascia board is to paint or stain it. This will help protect it from the elements and keep it looking good. In my experience, it’s best to use a high-quality paint or stain that is specifically designed for use on exterior wood.
Caulk and Putty
Caulking and putty are two other essential tools for maintaining your fascia board. They help fill in gaps and cracks, preventing water from seeping in and causing damage. Make sure to use a high-quality caulk and putty that is specifically designed for use on exterior wood.
Watch for Mold, Fungus, and Algae
Mold, fungus, and algae can all grow on your fascia board if it’s not properly maintained. These can cause damage and make your home look unsightly. If you notice any signs of mold, fungus, or algae, it’s important to take action right away. Use a high-quality cleaner specifically designed for use on exterior wood to clean the affected area.
Repairing Your Fascia Board
If your fascia board is damaged, it’s important to repair it as soon as possible. This will prevent further damage and keep your home looking good. In my experience, it’s best to hire a professional to repair your fascia board. They have the knowledge and expertise to do the job right.
Final Thoughts
Maintaining your fascia board is essential to keeping your home in good condition. By following these tips and tricks, you can ensure that your fascia board stays in good shape for years to come. Remember to paint or stain your fascia board, use caulk and putty, watch for mold, fungus, and algae, and repair any damage as soon as possible.
Addressing Damage and Repairs
If you have a damaged fascia board, it’s important to address the issue promptly to prevent further damage to your home. Moisture damage, cracks, and bowing are all signs that your fascia board needs repair. In this section, you’ll learn how to identify damage and make necessary repairs.
Identifying Damaged Fascia
Damaged fascia can be caused by a variety of factors, including weather, pests, and poor installation. If you notice any of the following signs, it’s likely that your fascia board is damaged and needs repair:
- Cracks or splits in the board
- Bowing or warping
- Peeling or flaking paint
- Signs of moisture damage, such as rot or mold
In my experience, it’s best to address fascia damage as soon as possible to prevent further damage to your home’s structure.
Moisture Damage
Moisture damage is one of the most common causes of fascia board damage. If you notice signs of moisture damage, such as rot or mold, it’s important to address the issue promptly. First, remove any damaged wood and replace it with new, treated lumber. Then, seal the area with a waterproof sealant to prevent future damage.
Cracks and Bowing
Cracks and bowing are also common signs of fascia board damage. If you notice cracks or splits in your fascia board, it’s important to repair them promptly to prevent further damage. In some cases, you may be able to fill the cracks with wood filler and sand them smooth. For more severe damage, it may be necessary to replace the entire board.
Repairing Your Fascia Board
In order to repair your fascia board, you’ll need to remove any damaged wood and replace it with new, treated lumber. It’s important to use the correct size nails for fascia board to ensure a secure fit. For most fascia boards, 8d or 10d nails are recommended. Be sure to use galvanized nails to prevent rust and corrosion.
In conclusion, if you have a damaged fascia board, it’s important to address the issue promptly to prevent further damage to your home. By identifying the signs of damage and making necessary repairs, you can ensure that your home’s structure remains strong and secure.
Dealing with Pests
Are pests wreaking havoc on your fascia board? Don’t worry; you’re not alone. Pests like birds, squirrels, and insects can cause significant damage to your fascia board, leading to costly repairs. But fear not, there are several ways to deal with these pests and protect your fascia board.
Protecting Your Fascia Board from Birds
Birds can be a significant pest when it comes to your fascia board. They often build nests in the gutters, causing water to overflow and damage the fascia board. To protect your fascia board from birds, consider installing bird deterrents like bird spikes or netting. These deterrents make it difficult for birds to land on your fascia board and build nests. In my experience, bird spikes are the most effective deterrent as they prevent birds from landing altogether.
Keeping Squirrels at Bay
Squirrels are notorious for causing damage to homes, including the fascia board. They often chew on the wood, causing significant damage. To keep squirrels at bay, consider installing squirrel guards. These guards are made of metal and wrap around the fascia board, preventing squirrels from accessing the wood. Additionally, you can apply a squirrel repellent to the fascia board to deter them from chewing on the wood.
Dealing with Insects
Insects like termites and carpenter ants can cause significant damage to your fascia board. They often burrow into the wood, causing it to weaken and rot. To protect your fascia board from insects, consider treating the wood with insecticide. You can also install insect screens on your gutters to prevent insects from accessing the fascia board. In my experience, treating the wood with insecticide is the most effective way to deal with insects.
Conclusion
Dealing with pests on your fascia board can be a frustrating and costly experience. However, by taking proactive measures like installing bird spikes, squirrel guards, and treating the wood with insecticide, you can protect your fascia board from damage. Remember, prevention is key when it comes to dealing with pests, so don’t wait until it’s too late to take action.
What Size Nails for Fascia Board: Pros and Cons of Different Fascia Materials
If you’re considering replacing your fascia board, you may be wondering what material to choose. There are several options available, each with their own set of pros and cons. In this section, we’ll take a closer look at the most common fascia materials and what makes them unique.
Aluminum Fascia Boards: Lightweight and Durable
Aluminum fascia boards are a popular choice for homeowners due to their lightweight and durable nature. They’re resistant to rust and rot, making them ideal for areas with high humidity or frequent rain. One of the biggest advantages of aluminum fascia boards is that they require very little maintenance. You won’t have to worry about painting or staining them every few years, which can save you time and money.
However, aluminum fascia boards can be more expensive than other materials, which may be a downside for some homeowners. They can also be difficult to install if you’re not experienced with working with metal.
Wood Fascia Boards: Traditional and Affordable
Wood fascia boards are a traditional choice that many homeowners prefer for their natural look and affordability. They’re easy to work with and can be painted or stained to match your home’s exterior. In addition, wood fascia boards are readily available at most home improvement stores.
However, wood fascia boards require more maintenance than other materials. They’re susceptible to rot and insect damage, which means you’ll need to inspect them regularly and replace any damaged sections. They’re also more prone to warping and cracking over time, which can be a concern for homeowners in areas with extreme weather conditions.
Plastic Fascia Boards: Low Maintenance and Affordable
Plastic fascia boards, also known as PVC fascia boards, are a low-maintenance and affordable option for homeowners. They’re resistant to rot and insect damage, which means you won’t have to worry about replacing them as often as wood fascia boards. They’re also easy to clean and require no painting or staining.
However, plastic fascia boards can be less durable than other materials. They can crack or warp over time, especially in areas with extreme temperatures. They’re also not as environmentally friendly as other materials, as they’re made from non-renewable resources.
Composite Fascia Boards: Durable and Eco-Friendly
Composite fascia boards, also known as composite decking, are a durable and eco-friendly option for homeowners. They’re made from a combination of wood fibers and recycled plastic, which makes them resistant to rot and insect damage. They’re also available in a variety of colors and textures, which can give your home a unique look.
However, composite fascia boards can be more expensive than other materials. They’re also heavier than other materials, which can make them more difficult to install. In addition, composite fascia boards can fade over time, especially in areas with high UV exposure.
In my experience, the best fascia material depends on your personal preferences and budget. If you’re looking for a low-maintenance and durable option, aluminum or plastic fascia boards may be the way to go. However, if you prefer a more traditional look and don’t mind doing some maintenance, wood fascia boards may be a better choice. Composite fascia boards are a good option if you’re looking for a durable and eco-friendly material, but they can be more expensive.
What Size Nails for Fascia Board: Considerations When Hiring a Contractor
When it comes to installing a fascia board, it’s important to hire a contractor who knows what they’re doing. But with so many options out there, how do you choose the right one? Here are some considerations to keep in mind when hiring a contractor for your fascia board installation project.
Budget Constraints
Before you start looking for a contractor, it’s important to set a budget for your project. This will help you narrow down your options and ensure that you don’t overspend. Keep in mind that the cost of hiring a contractor can vary depending on their experience, location, and the size of the project. In general, you can expect to pay anywhere from $300 to $1,000 for a fascia board installation.
Contractor Experience
One of the most important factors to consider when hiring a contractor is their experience. You want to make sure that they have the skills and knowledge necessary to complete your project successfully. Ask potential contractors how long they’ve been in business and if they have experience working with fascia boards specifically. You can also ask for references and check online reviews to get a better idea of their track record.
Lowes as a Resource
If you’re not sure where to start your search for a contractor, consider checking out Lowes. They offer a variety of contractor services, including fascia board installation. You can browse their website to find contractors in your area and read reviews from other customers. Keep in mind that Lowes contractors may have different pricing and availability than independent contractors.
In my experience, hiring a contractor for a home improvement project can be overwhelming. But by keeping these considerations in mind and doing your research, you can find a contractor who will get the job done right.
Enhancing Curb Appeal with Fascia Boards
Are you looking for a way to enhance your home’s curb appeal? Look no further than fascia boards! These boards not only provide a finished look to your roofline but also protect your home’s exterior from water damage. Plus, with the right size nails, you can easily attach them to your home and create a beautiful and polished look.
In my experience, fascia boards are a simple and cost-effective way to add a touch of sophistication to your home’s exterior. By choosing the right color and style, you can complement your home’s existing architecture and boost its overall curb appeal.
Choosing the Right Size Nails
When it comes to attaching fascia boards to your home, it’s important to choose the right size nails. Using nails that are too small can cause the boards to come loose, while using nails that are too large can split the wood. The recommended nail size for attaching fascia boards is 8d or 10d galvanized nails.
Painting Your Fascia Boards
Once you’ve attached your fascia boards to your home, you may want to paint them to match your home’s existing color scheme. To ensure a smooth and long-lasting finish, it’s important to properly prepare the boards before painting. This involves sanding the boards to remove any rough spots and applying a primer before painting.
Adding a Finished Look
Fascia boards not only protect your home’s exterior and provide a base for your gutters, but they can also add a polished and finished look to your roofline. By choosing a color and style that complements your home’s existing architecture, you can create a cohesive and sophisticated look that enhances your home’s curb appeal.
In conclusion, fascia boards are a simple and cost-effective way to enhance your home’s curb appeal and protect your home’s exterior from water damage. By choosing the right size nails, painting your boards, and adding a finished look, you can create a beautiful and polished look that complements your home’s existing architecture.
Understanding the Role of Fascia in Roofing
If you’re planning to install a new roof or renovate your existing one, you’ve probably heard the term “fascia” thrown around quite a bit. But what exactly is fascia, and why is it so important in roofing? In this section, we’ll take a closer look at the role of fascia in roofing and explore why it’s a critical component of any roofing system.
Fascia is a horizontal board that runs along the edge of your roof, where the roof meets the exterior walls of your home. Its primary function is to protect the roof and the interior of your home from water damage by directing rainwater away from the roof and into the gutters. Fascia also provides a finished look to the roof’s edge, giving it a clean, polished appearance.
In my experience, many homeowners overlook the importance of fascia in their roofing system. They may focus on the shingles or the gutters, but neglect to give the fascia the attention it deserves. However, failing to properly install or maintain your fascia can lead to serious problems down the road, including water damage, mold growth, and even structural damage to your home.
Here are some of the key points to keep in mind when it comes to fascia:
- Fascia should be installed directly onto the roof decking and secured with nails or screws. The size of the nails or screws will depend on the thickness of the fascia board and the type of material it’s made from. We’ll explore this topic in more detail later in this article.
- Fascia should be sloped slightly downward, away from the roof, to ensure that water drains properly into the gutters. This slope is typically around 1/4 inch per foot.
- Fascia should be installed in conjunction with other roofing components, including drip edge, soffit, and sub-fascia. These components work together to create a watertight seal around your roof and prevent water from seeping into your home.
As you can see, fascia plays a critical role in protecting your home from water damage and ensuring that your roofing system functions properly. By understanding the importance of fascia and taking steps to install and maintain it correctly, you can help ensure that your home stays safe, dry, and structurally sound for years to come.
What Size Nails for Fascia Board: Impact of Weather Conditions
Are you wondering what size nails for fascia board to use to withstand harsh weather conditions? It’s important to consider the weather when choosing the size of nails for your fascia board. Weather conditions such as water, temperature changes, and rust can all have an impact on the durability of your fascia board. In this section, we’ll discuss how these weather conditions can affect your fascia board and what size nails you should use to ensure it stays intact.
Water: The Silent Destroyer
Water can be one of the most destructive elements when it comes to your fascia board. If water gets into the wood, it can cause rot and weaken the board’s structural integrity. This can be especially problematic if you live in an area with high rainfall or frequent storms.
To prevent water damage, it’s important to use nails that are resistant to rust and corrosion. Stainless steel nails are a great option because they are highly resistant to rust and can withstand exposure to water without corroding. In my experience, using stainless steel nails has helped me avoid costly repairs and replacements due to water damage.
Temperature Changes: The Enemy of Wood
Temperature changes can also have a significant impact on your fascia board. Wood expands and contracts with changes in temperature and humidity, which can cause nails to loosen and the board to warp or split. This can be especially problematic if you live in an area with extreme temperature fluctuations.
To prevent damage from temperature changes, it’s important to choose nails that are long enough to penetrate the fascia board and secure it to the rafters. A good rule of thumb is to use nails that are at least 1.5 times the thickness of the board. This will ensure that the nails are long enough to hold the board in place even when it expands and contracts.
Rust: The Silent Killer
Rust can also be a major problem when it comes to your fascia board. Rusty nails can weaken and corrode, causing them to lose their grip on the board. This can lead to the board becoming loose and unstable, which can be dangerous and costly to repair.
To prevent rust from damaging your fascia board, it’s important to use nails that are made from materials that are resistant to rust and corrosion. Stainless steel nails are a great option because they are highly resistant to rust and can withstand exposure to water without corroding. In addition, galvanized nails are also a good option because they are coated with a layer of zinc that helps to prevent rust and corrosion.
In conclusion, choosing the right size nails for your fascia board is crucial to ensuring its durability and longevity. By considering the impact of weather conditions such as water, temperature changes, and rust, you can choose nails that are resistant to these elements and will keep your fascia board secure for years to come.
Fascia Board Installation Tips
When it comes to installing fascia boards, there are a few important things to keep in mind. Whether you’re working with wood, Hardie trim, or UPVC, the following tips will help you ensure a successful installation.
What Size Nails to Use
One of the most important considerations when installing fascia boards is what size nails to use. The size of the nails will depend on the thickness of the fascia board and the size of the rafter ends. In general, it’s recommended to use 8d or 10d galvanized nails for fascia board installation.
Fastening the Fascia Board
To fasten the fascia board to the rafter ends, you’ll need to pre-drill holes in the fascia board. This will help prevent splitting and ensure a secure installation. It’s also important to use screws instead of nails for added strength and durability.
Supporting the Fascia Board
To ensure proper support for the fascia board, it’s important to install blocking between the rafters. This will help prevent the fascia board from sagging or warping over time.
Preventing Corrosion
To prevent corrosion and ensure a long-lasting installation, it’s important to use galvanized or stainless steel screws and nails. This will help prevent rust and other forms of corrosion that can weaken the installation over time.
Using Hardie Trim or UPVC
If you’re working with Hardie trim or UPVC, it’s important to follow the manufacturer’s installation instructions carefully. These materials require specific installation techniques and may require special tools or hardware.
In my experience, following these tips and guidelines will help ensure a successful fascia board installation. By choosing the right size nails and screws, pre-drilling holes, providing proper support, and preventing corrosion, you can ensure a long-lasting and secure installation that will protect your home for years to come.


