
Imagine transforming your cramped living room into a spacious haven with an open floor plan. Sounds enticing, right? But there’s one colossal barrier – that load-bearing wall. Many homeowners and property investors see it as an immovable object. But what if I told you it’s not as impossible as it seems?
The clock’s ticking, and that open space isn’t going to create itself. The question is, are you ready to seize this opportunity to revolutionize your space?
But wait! How do you even identify a load-bearing wall?
What happens to your house if you take it out without proper support?
How long is the whole process going to take?
And isn’t there something about getting a permit?
All these burning questions, and more, will be answered in this guide. So brace yourself (pun intended), because we’re about to redefine the boundaries of your home.
- Removing a Load-Bearing Wall: Identify the wall, plan the support, remove the wall, replace with a beam, and finish with inspections and cosmetics.
- Risks Involved: Inadequate removal can cause significant structural damage. Always consult professionals for safety.
- Cost Factors: Costs vary depending on complexity, permits, labor, materials, and potential damage repairs.
- Identifying Load-Bearing Walls: Look for alignment with other walls, exterior walls, or perpendicular to floor joists. Always verify with a professional.
- Role of a Structural Engineer: They assess the situation, help design the load-bearing beam, and provide peace of mind.
- Impact on Spaces: Removing a load-bearing wall can create a spacious, open floor plan, adding value to your property.
- Legal Considerations: Always adhere to local building codes and obtain necessary permits before starting.
Nailing Down the Basics: Load-Bearing Walls Uncovered
Do you ever look at your house and think, “If only this wall wasn’t here…”? You’re not alone. But before you reach for that sledgehammer, let’s talk about why some walls in your home are more than just separators between rooms.
The Skinny on Load-Bearing Walls
I can still remember the first time I decided to take a swing at home renovation. (In my case, it was a literal swing — sledgehammer in hand and a wall in my sights.) From the outside, a wall seems like a wall. But what I found is that, much like a mystery novel, there’s always more than meets the eye.
Load-bearing walls play an integral role in supporting your home. They’re like the backbone of your house, taking the weight of the roof and upper floors, and transferring it down to the foundation. Without them, you’d have less of a house and more of an expensive game of Jenga.
But don’t worry, your house isn’t going to crumble like a cookie if you remove a load-bearing wall. You just need to replace the support it provides in some way. It’s like a relay race: you can pass the baton, but someone needs to be there to take it.
Your House’s Weightlifting Champion: The Role of Load-Bearing Walls
If you think about it, your house is a bit like a giant sandwich. The roof and foundation are the slices of bread, and the load-bearing walls are the toothpicks holding everything together. Take away the toothpicks, and well… let’s just say you won’t enjoy picking up the pieces.
The weight of the structure — the roof, upper floors, and sometimes even additional loads like snow — bears down on these walls. This force is then transferred down to the foundation. The process is a lot like an assembly line, with the load being passed down until it reaches the foundation.
Dropping the Ball: What Happens Without Load-Bearing Walls
Picture this: you’re at a crowded party, and you’ve got a plate full of food in one hand and a drink in the other. Now imagine someone decides it’s the perfect time for a surprise high-five. That’s pretty much what happens to your house when a load-bearing wall is removed without replacing its support.
Without a load-bearing wall, the weight of the roof and upper floors has nowhere to go. The remaining structure may not be able to handle the additional load, leading to structural problems — think cracks in walls and doors that won’t close properly. Or, in worst-case scenarios, total structural failure. And trust me, that’s one surprise party you don’t want to attend.
When it comes to remodeling or renovation, it’s critical to understand which walls are load-bearing. After all, you want your project to make a splash, but not because your house ended up in the pool!
Wall Detective: Identifying Load-Bearing Walls in Your Home
Remember the time you spent an hour looking for your keys only to find them in your pocket? Identifying load-bearing walls can feel a bit like that, daunting but surprisingly obvious once you know what you’re looking for. But fear not, this guide will help you distinguish the wall of fame from the wall of shame in no time.
The Great Wall: Load-Bearing or Not?
Let me take you back a few years. One afternoon, I decided to knock down a wall in my living room. I thought, “Hey, how hard can it be?” But as I later discovered, it’s not about whether you can swing a hammer. It’s about knowing which wall to hit.
Distinguishing between load-bearing and non-load-bearing walls is not as simple as eeny, meeny, miny, moe. It’s not always apparent, kind of like finding the beginning of a roll of tape. But there are signs that can point you in the right direction.
Anatomy of a Load-Bearing Wall
Load-bearing walls are kind of like the quarterbacks of your home — they’re carrying the team, or in this case, your roof. And like a good quarterback, they’re built tough. They’re usually straight and continuous, extending from one side of your house to the other. And while we’re on the topic of football, think of non-load-bearing walls as the cheerleaders — they look great, but they’re not doing much of the heavy lifting.
Tools of the Trade: The Stud Finder
Now, we’ve all heard the joke about the guy who holds a stud finder up to himself and declares, “Found one!” But in all seriousness, a stud finder is an invaluable tool for identifying load-bearing walls. It’s kind of like having a sixth sense, but for drywall.
A stud finder will help you locate the vertical studs that are characteristic of load-bearing walls. It’s a bit like playing hide and seek, except your opponent is a 2×4, and it can’t really hide.
So next time you’re planning to tear down a wall in your home, remember the tale of my ill-fated living room renovation. Not all walls are created equal, and knowing which is which could save you a ton of headache — or, you know, the entire structure of your house.
The Domino Effect: How Removing Load-Bearing Walls Shakes Up Your Home’s Structure
Ever wondered what would happen if you tried to remove the bottom card from a perfectly balanced house of cards? The thought is nerve-wracking, right? Well, that’s what removing a load-bearing wall can do to your house. But don’t fret; we’re here to provide some clarity about the potential impacts.
Toppling Towers: The Impact on Your Home’s Integrity
Let’s get serious for a moment, and let me share a bit of my own experience. It was back when I was a fresh-faced, eager newbie in the renovation world. I thought, “Hey, I can handle this wall removal business.” Little did I know, my naivety was about to deliver a jarring punch of reality.
Removing a load-bearing wall without the proper precautions is like defusing a bomb with a sledgehammer – it’s risky, ill-advised, and generally ends with a bang. And when I say bang, I don’t mean the fun, confetti-filled kind. The consequences can be catastrophic, impacting the structural integrity of your home.
Dropping Floors: The Upper Level Impact
Think of the upper floors of your home as the picky eaters at the dinner table; they need constant support. Remove a load-bearing wall, and you’re effectively pulling the chair out from under them. Not cool, right? So if you fancy your upper floors staying, well, ‘upper’, you’d do well to respect the hardworking walls that support them.
Roof Collapse: It’s Not Just About the Floors
Now, let’s talk about your roof. It’s not just there to keep the rain off; it’s a critical component of your home’s structure. Removing a load-bearing wall can cause the roof to sag, much like your pants when you forget to wear a belt. So, unless you fancy a skylight where your living room used to be, it’s best to tread carefully.
Playing Jenga with Your Home: Overall Structure
Imagine playing Jenga, but instead of wooden blocks, you’re dealing with bricks and beams. Now picture removing one of the bottom pieces. Yeah, not the prettiest picture, right? That’s precisely what you’re doing when you remove a load-bearing wall without the proper strategy. You’re not just changing the layout; you’re messing with the overall structure.
In short, we can agree that knocking down walls isn’t child’s play. It’s a task that requires knowledge, precision, and a healthy respect for gravity. Remember, the integrity of your home is on the line. So before you pick up that sledgehammer, make sure you’re swinging it at the right wall.
Wall Street: Unveiling the Insider Secrets of Exterior, Interior, Partition, and Temporary Walls
You might be thinking, “A wall is just a wall, right?” Wrong! Just like no two snowflakes are alike, not all walls are created equal. Each type of wall in your home has a distinct purpose and significance. It’s like a game of chess; every piece has its unique role and value. So buckle up, we’re about to embark on an exciting expedition into the diverse world of walls.
Unmasking the Four Musketeers: Exterior, Interior, Partition, and Temporary Walls
To the untrained eye, a wall is just a barrier that keeps the wind out and the privacy in. But to the well-informed homeowner (like you’re about to be), walls are far more complex and fascinating.
Exterior walls, the sturdy guards of your castle, are the first line of defense against the elements. They bear the brunt of rain, wind, and everything Mother Nature can throw at them. They’re the reliable big brothers of the wall family, always protecting their interior siblings.
Now, interior walls, on the other hand, are the social butterflies of the house. While they might not be wrestling with weather like their exterior siblings, they play a vital role in defining spaces within your home. These walls can be either load-bearing or non-load-bearing, proving that you shouldn’t judge a wall by its cover (or drywall, in this case).
Partition walls are the organizers of the family. They’re like those color-coded, hyper-organized folks who always have everything in its place. They divide larger spaces into smaller, more usable areas without bearing any structural loads. And the best part? They can be constructed out of various materials, from bricks to glass, making them the chameleons of wall types.
Finally, we have temporary walls. Now, these walls are the nomads of the home. Need an extra room for a short while? Call up a temporary wall. But just because they’re temporary doesn’t mean they’re flimsy or unreliable. They’re quick to install, easy to remove, and surprisingly sturdy.
Remember that understanding the difference between various types of walls is key. It’s not just about knowing where to hang your favorite painting. It’s about understanding the underlying structure of your home and making informed renovation decisions. Because in the grand scheme of things, every wall matters.
Suit Up: Gearing up for Safety and Compliance Before Removing Load-Bearing Walls
Ever watched those home renovation shows where homeowners gleefully knock down walls with a sledgehammer? It’s thrilling, right? Hold that thought. Because before you channel your inner Thor, there are a few safety and compliance measures to consider. This is not your average DIY project. We’re talking about major structural alterations to your home, not assembling an IKEA bookshelf. Now, let’s dive into the nitty-gritty of permits, inspections, and ensuring safety before going hammer and tongs at your walls.
Building Permits and Inspections: Your First Step to Safe Renovations
You might be wondering, “Why bother with permits and inspections? Can’t I just go full swing into my renovation project?” Well, in short, no. It’s not just about adhering to codes and regulations, it’s about ensuring the safety of you and your family. Imagine trying to drive a car without a license, pretty risky, right? Same thing with home renovations – navigating without a permit can lead to some serious mishaps.
Building permits are your golden ticket to a safe and legal renovation. They ensure that your plans comply with local building codes and zoning laws. You wouldn’t want to finish your project only to find out that it’s not up to code and needs to be redone (talk about a money sinkhole!). So save yourself the headache and get that permit.
Next up is the safety inspection. It’s like having a seasoned guide accompany you on an adventurous hike, ensuring you don’t take a wrong step. It’s particularly crucial when dealing with load-bearing walls, which, as we’ve discussed, have the critical role of supporting your home’s structure. The inspection will help identify potential risks, like electrical wires running through the wall, which you wouldn’t want to accidentally hit (unless a surprise fireworks show inside your house sounds appealing to you).
I’ve got a buddy, let’s call him “DIY Dave”, who once thought he could bypass the whole permit and inspection rigmarole. Long story short, he ended up causing some serious damage to his home’s structure and had to hire professionals to clean up his mess. Moral of the story? Don’t be like DIY Dave. Get a permit, get an inspection, and ensure your project is safe and compliant. And remember, sometimes taking a sledgehammer to your problems isn’t the best solution. Especially when those problems are load-bearing walls.
“Supporting” Your Renovation Dreams: The Art of Installing Temporary Support Walls
Imagine building a sandcastle without the crucial middle tower. It doesn’t hold up, right? Now, replace that sandcastle with your house. (Well, that escalated quickly.) But here’s the good news: this is where temporary support walls strut onto the stage. They’re the unsung heroes of the renovation process, keeping everything intact while you work your remodeling magic. Let’s roll up our sleeves and dig into the process and importance of these vital props.
Temporary Support Walls: Your Safety Net in the High-Wire Act of Renovations
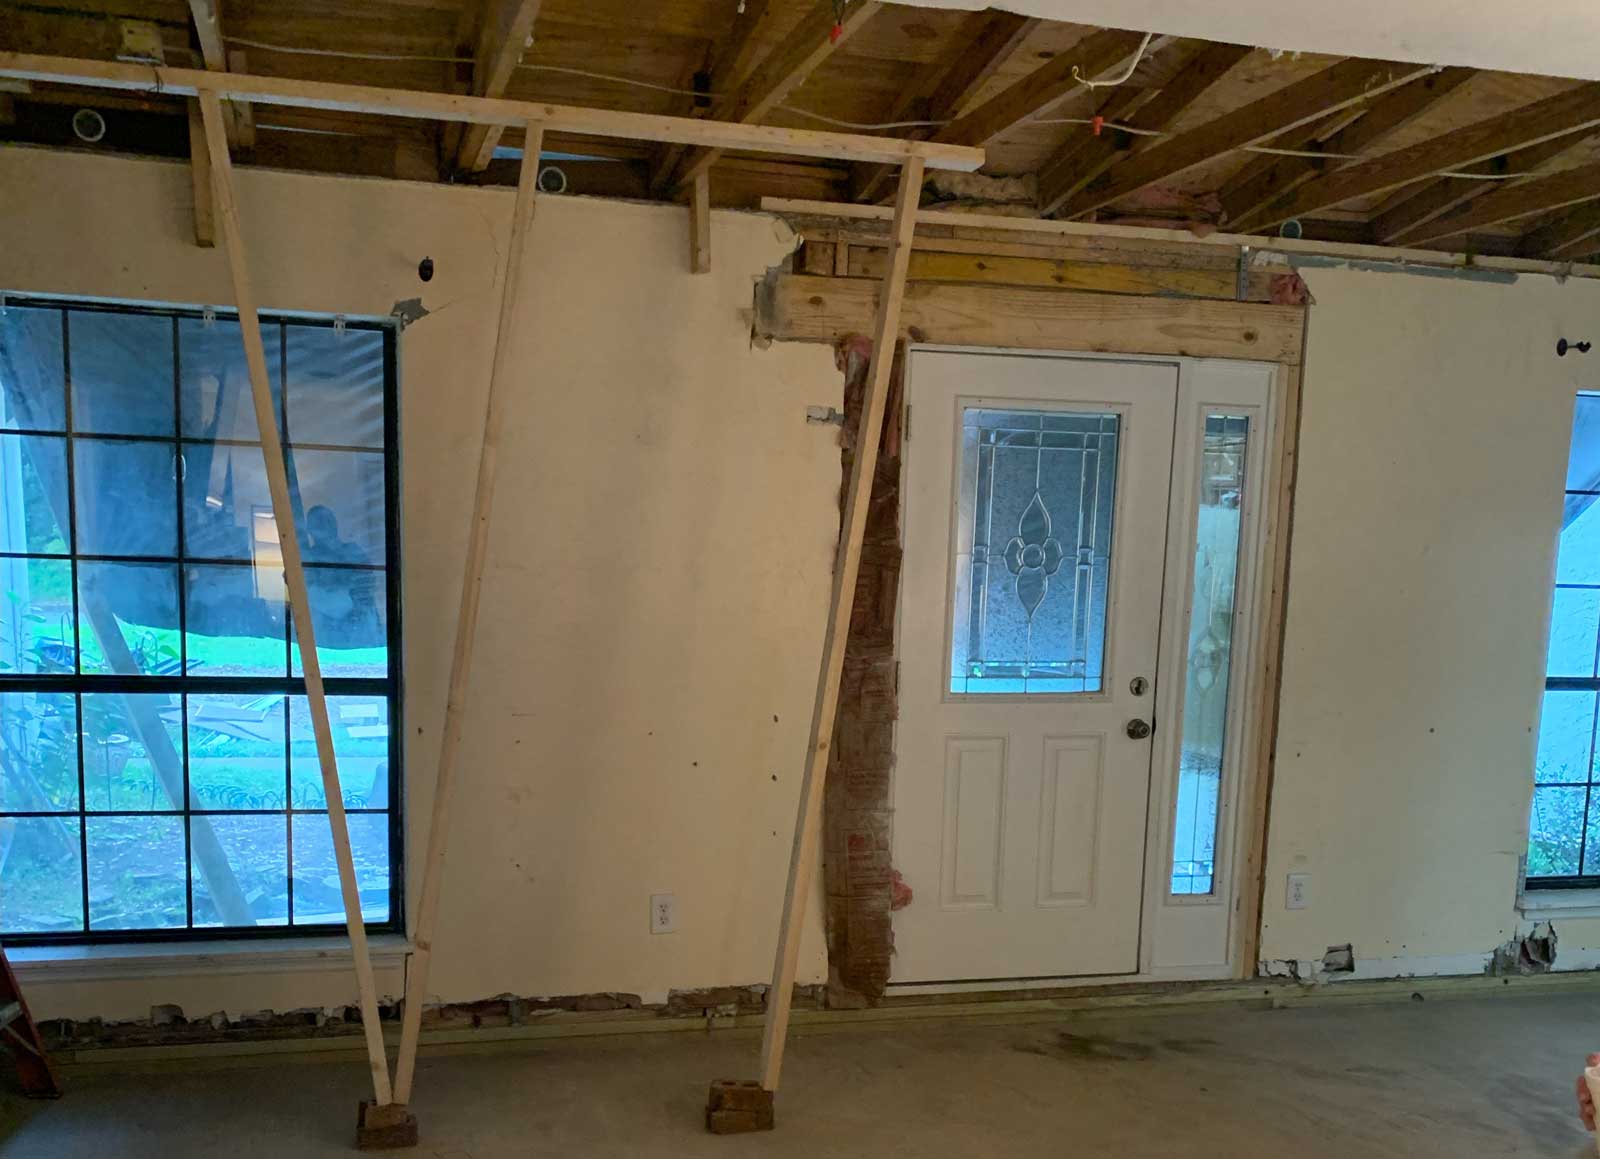
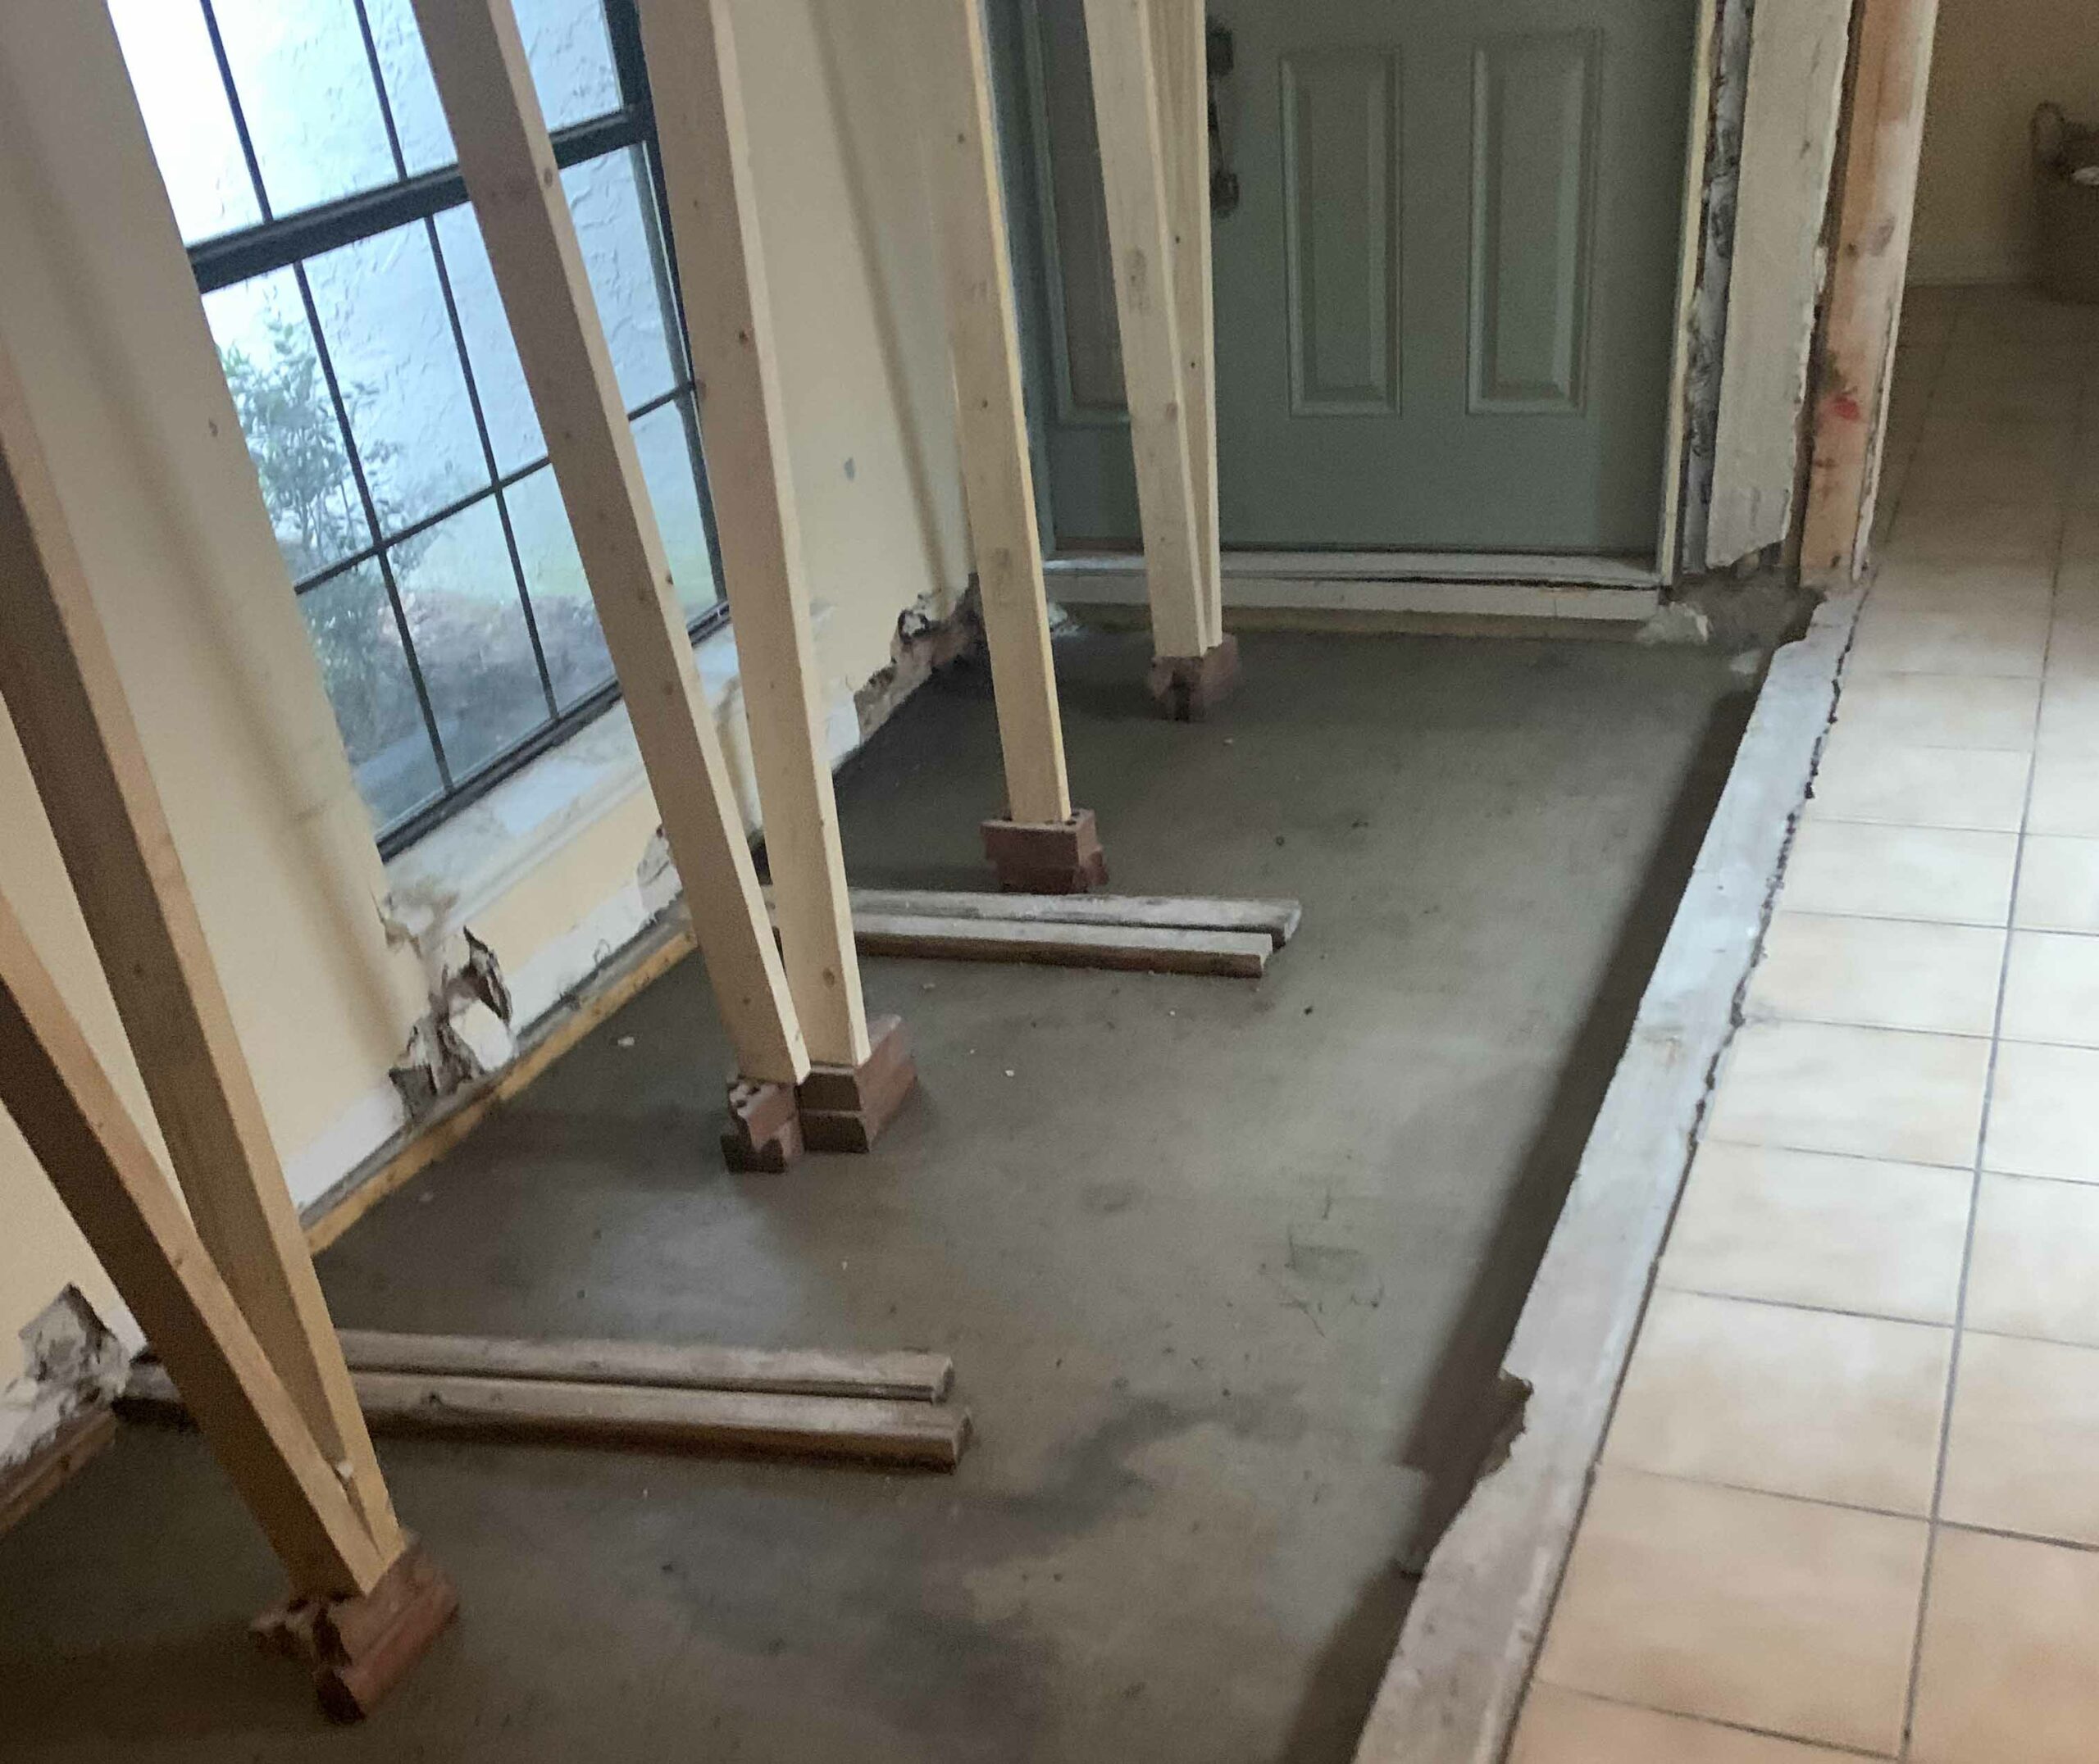
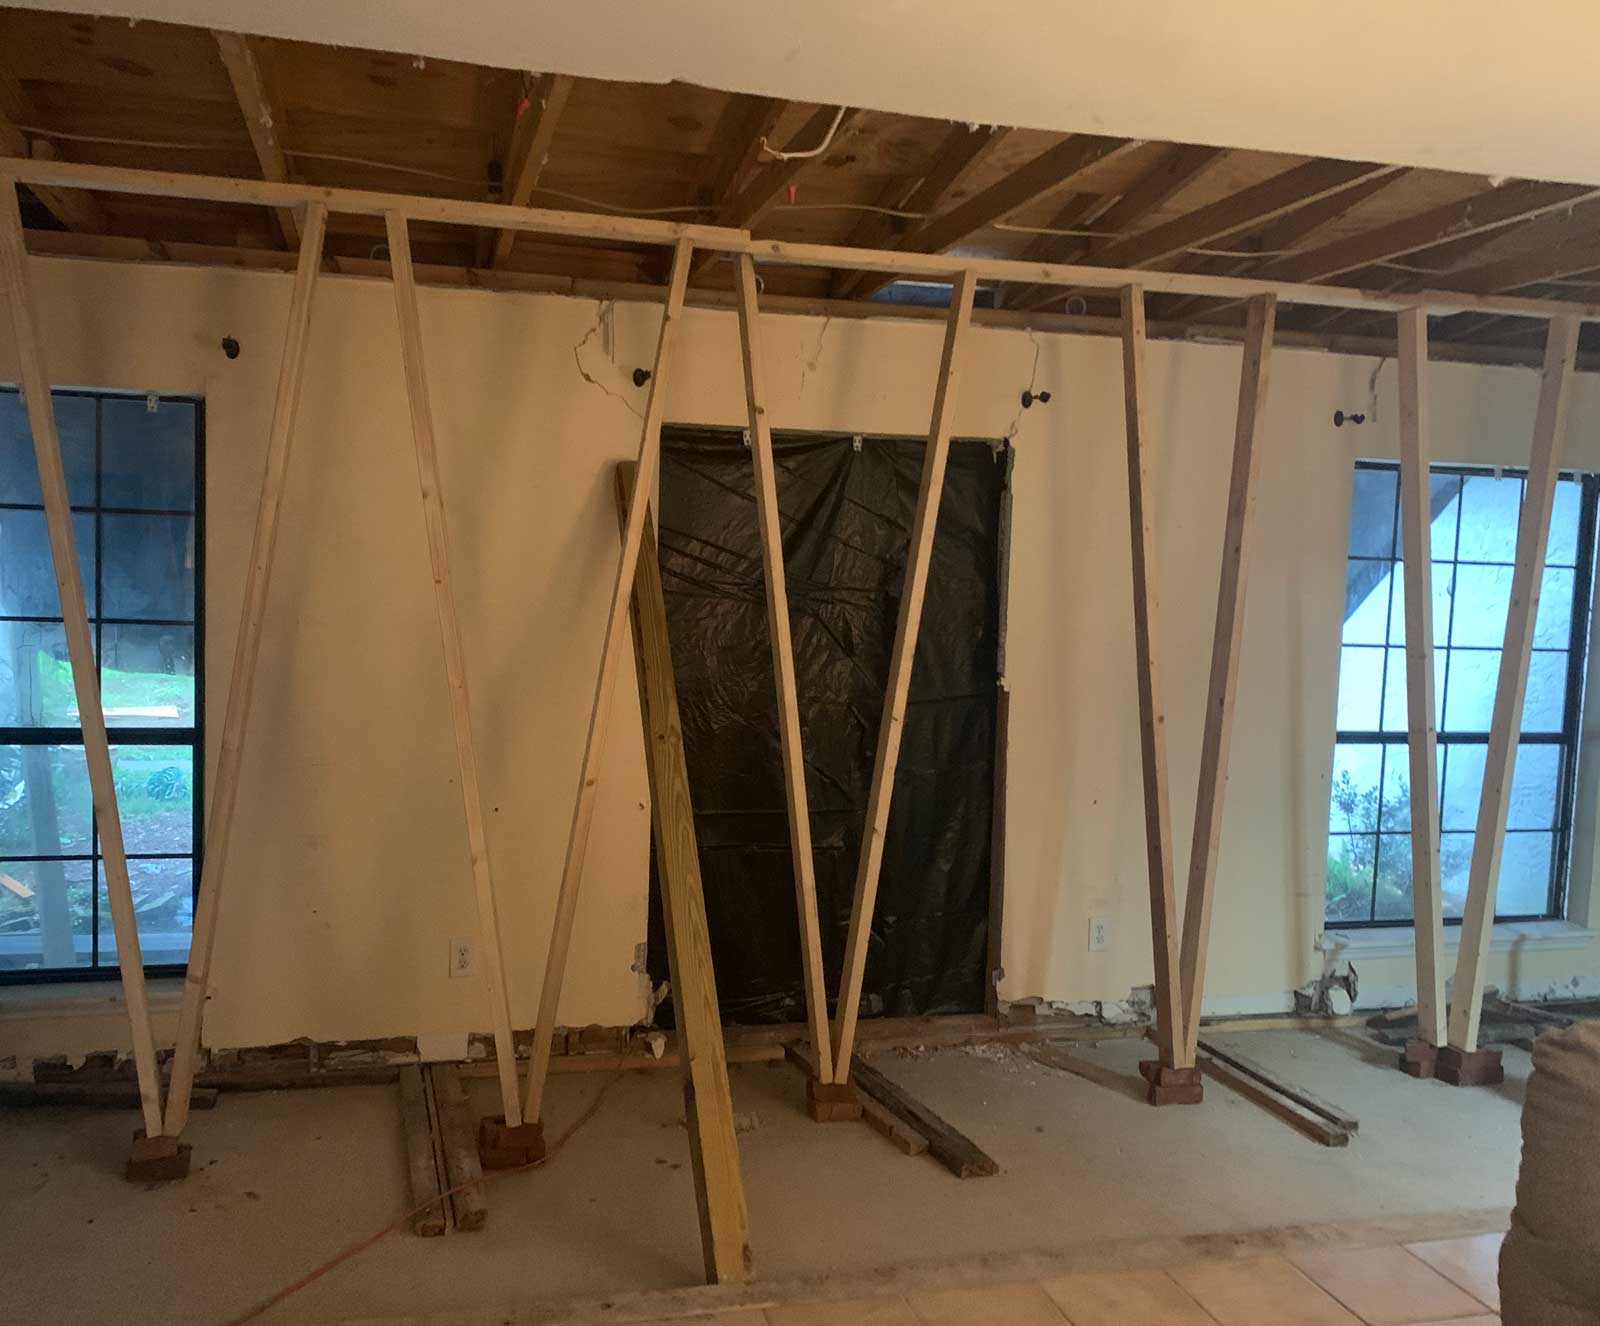
Imagine you’re a trapeze artist. You wouldn’t just leap into the air without a safety net below, right? Similarly, in the world of renovations, temporary support walls act as your safety net. They’re designed to take over the job of the load-bearing wall you’re removing – essentially, they’re the stunt double to your star actor.
Setting up a temporary support wall isn’t something you want to wing. It’s a methodical process that requires careful planning and execution. You’ve got to know where to place it, how to construct it, and most importantly, how to ensure it’s robust enough to bear the weight of your home’s structure while you work on the main wall.
Here’s a fun little anecdote: When I was helping my cousin renovate his 1970s bungalow, we thought we could skip the temporary support wall. Turns out, we couldn’t. As soon as we began working on the load-bearing wall, we heard a loud groan from the house. It was as if the house was saying, “Hey, I need a little support here!” Lesson learned. We quickly set up a temporary support wall, and voilà, the rest of the project went smoothly. (So remember, don’t make our mistake. Your house needs support, just like we all do on a Monday morning.)
One more thing to note: The installation process often involves setting up a support beam, which bridges the gap left by the removed wall. This beam works hand in hand with the temporary support wall, ensuring your upper floors don’t come down to say an unwanted “hello” to your ground floor.
In the high-stakes game of home renovations, don’t forget to employ these vital understudies. They may not get the spotlight, but trust me, you wouldn’t want to go on stage without them.
The “Breaking” News: Your Step-by-Step Guide to Load-Bearing Wall Removal
Have you ever watched one of those cooking shows where the chef makes everything look so simple and then you’re in your kitchen later questioning why your soufflé resembles a pancake? No more of that – especially not with a load-bearing wall. You see, we’re about to embark on a step-by-step journey together, a journey that’ll transform your space from sardine can to spacious splendor. So strap on your tool belt and prepare to feel like a bona fide DIY superhero as we walk through the nitty-gritty of load-bearing wall removal.
DIY Chronicles: How to Successfully Take Down That Load-Bearing Wall
Now, before we kick off this step-by-step guide, let me remind you that removing a load-bearing wall is not a race. It’s a process, a task requiring careful planning and execution.
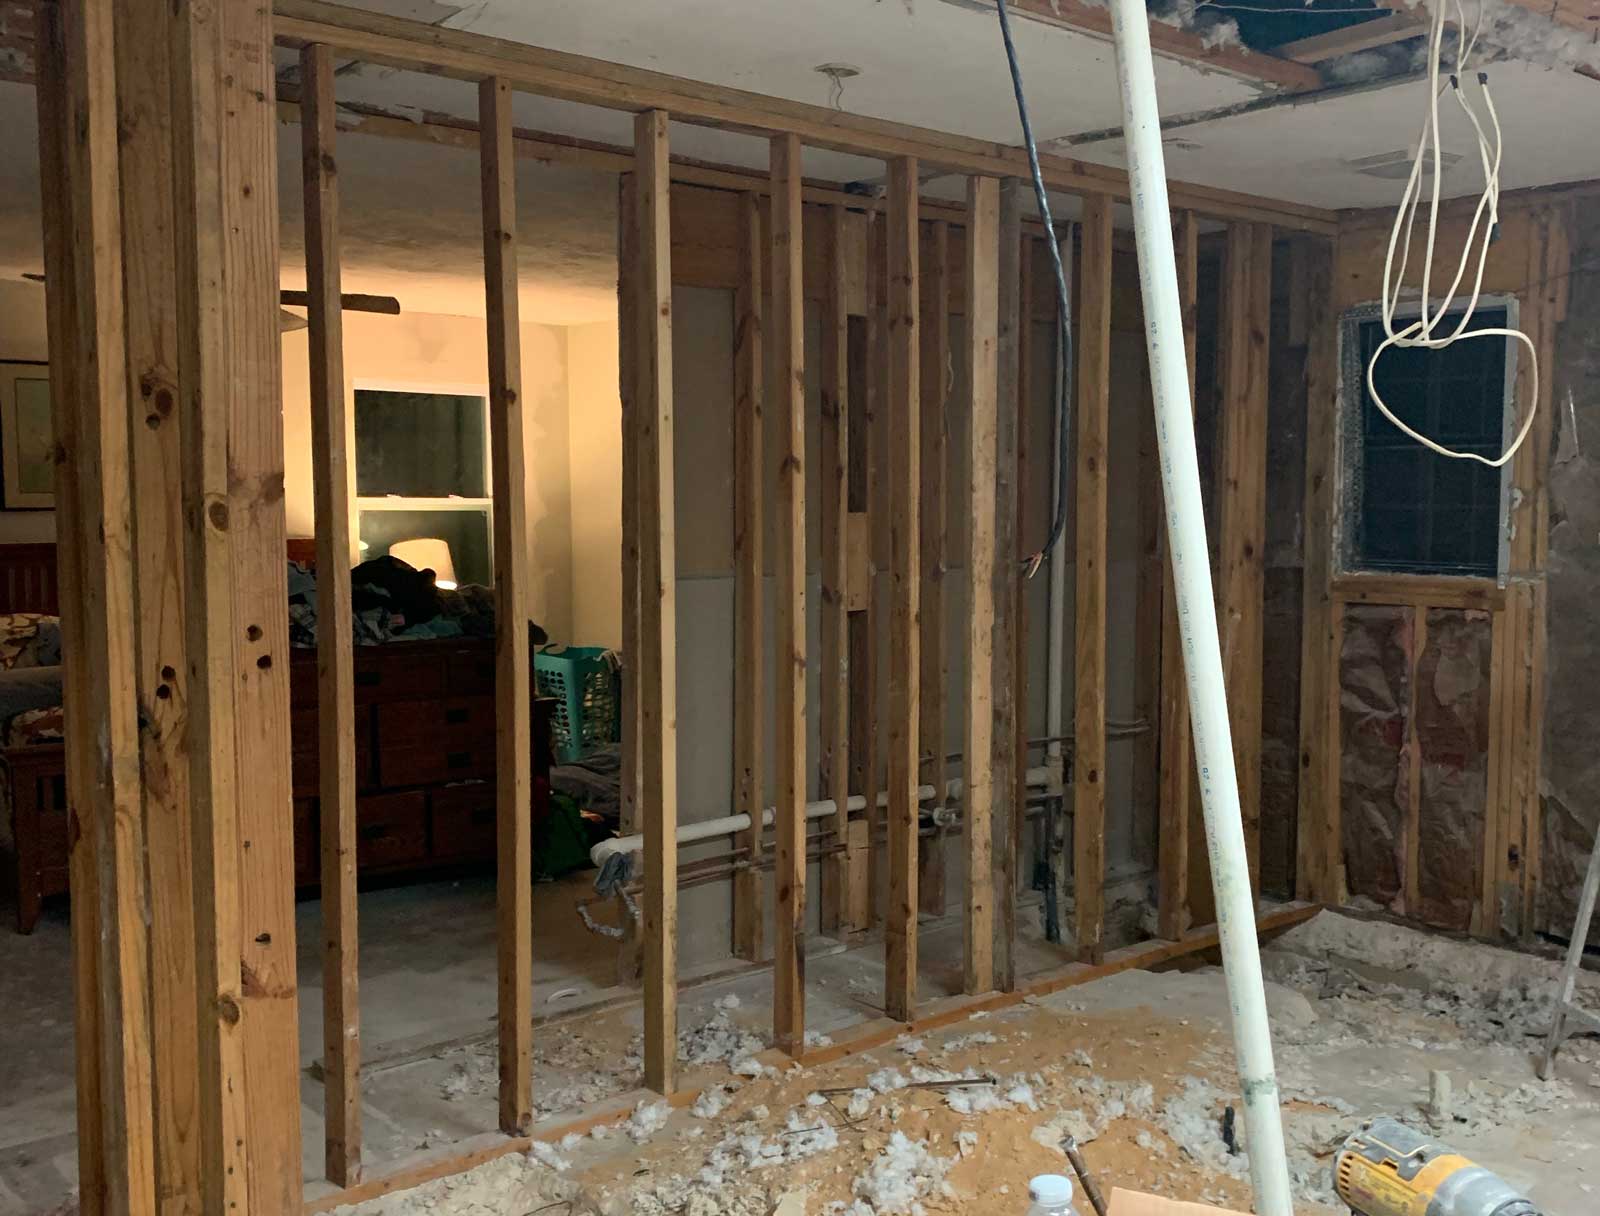
When it comes to load-bearing wall removal, the first thing you need to do is… hold your horses. That’s right. You don’t just swing the sledgehammer like some Wild West cowboy. You need to prep, and that means setting up the temporary support wall we chatted about earlier. You know, that vital safety net that stops your house from turning into a Picasso painting? (Believe me, it’s not as trendy as it sounds.)
Once you’ve got that up, it’s time to work on the actual load-bearing wall. First, you start by removing any fixtures, like electrical outlets or light switches (they’re not a big fan of sledgehammers, who knew?). Then, using a saw or reciprocating tool, you carefully cut into one side of the wall. Just be sure to wear protective eyewear – safety first!
It’s always a good idea to work in manageable sections rather than aiming for the ‘wall-be-gone’ approach. This helps prevent any accidental structural shifts and keeps the removal process controlled. Trust me on this one; in my experience, a slow, methodical approach always wins the day.
With patience, diligence, and a good understanding of the steps, your load-bearing wall can be removed successfully, turning that DIY project into a DIY triumph. From there, you’re free to restructure and reshape your space as you see fit. Just remember to keep the celebratory jig until after the support beam is safely in place. The last thing you want is a spontaneous game of “the floor is lava.” (Unless you’re into that sort of thing, then, by all means…)
The “Breaking” News: Your Step-by-Step Guide to Load-Bearing Wall Removal
Have you ever watched one of those cooking shows where the chef makes everything look so simple and then you’re in your kitchen later questioning why your soufflé resembles a pancake? No more of that – especially not with a load-bearing wall. You see, we’re about to embark on a step-by-step journey together, a journey that’ll transform your space from sardine can to spacious splendor. So strap on your tool belt and prepare to feel like a bona fide DIY superhero as we walk through the nitty-gritty of load-bearing wall removal.
DIY Chronicles: How to Successfully Take Down That Load-Bearing Wall
Now, before we kick off this step-by-step guide, let me remind you that removing a load-bearing wall is not a race. It’s a process, a task requiring careful planning and execution.
When it comes to load-bearing wall removal, the first thing you need to do is… hold your horses. That’s right. You don’t just swing the sledgehammer like some Wild West cowboy. You need to prep, and that means setting up the temporary support wall we chatted about earlier. You know, that vital safety net that stops your house from turning into a Picasso painting? (Believe me, it’s not as trendy as it sounds.)
Once you’ve got that up, it’s time to work on the actual load-bearing wall. First, you start by removing any fixtures, like electrical outlets or light switches (they’re not a big fan of sledgehammers, who knew?). Then, using a saw or reciprocating tool, you carefully cut into one side of the wall. Just be sure to wear protective eyewear – safety first!
It’s always a good idea to work in manageable sections rather than aiming for the ‘wall-be-gone’ approach. This helps prevent any accidental structural shifts and keeps the removal process controlled. Trust me on this one; in my experience, a slow, methodical approach always wins the day.
With patience, diligence, and a good understanding of the steps, your load-bearing wall can be removed successfully, turning that DIY project into a DIY triumph. From there, you’re free to restructure and reshape your space as you see fit. Just remember to keep the celebratory jig until after the support beam is safely in place. The last thing you want is a spontaneous game of “the floor is lava.” (Unless you’re into that sort of thing, then, by all means…)
“Beam Me Up, Scotty”: Installing the New Support Structure
Is there anything more satisfying than breaking something down and building it back up again? It’s a rhythm as old as time – the heartbreak of deconstruction followed by the exhilaration of rebirth. It’s where we are right now: having dismantled that load-bearing wall, it’s time to look at installing the new beam. A beam so solid, you could call it the Arnold Schwarzenegger of house support (minus the “I’ll be back” catchphrase, of course).
Becoming the “Beam” Team: How to Install Your New Beam
When it comes to beams, you’ve got options. From steel to wood, each comes with its own pros and cons. But they all share one thing in common: they are the superheroes of structural support. So, let’s understand how to give your new beam the red-carpet welcome it deserves.
Once you’ve removed your load-bearing wall, it’s time to introduce your new best friend – the new beam. This beam will be the key player in redistributing the weight and ensuring that your house stays standing tall and proud. And, I can’t stress enough how important it is to take your time with this. You don’t want to be known as the ‘Hulk’ of the DIY world (and not in a cool, Marvel way).
Let’s talk steel beams. When it comes to strength and durability, they’re the LeBron James of the beam world. Yes, they’re heavy, and yes, they can be a bit tricky to install, but the payoff is fantastic. They can bear more weight over longer spans, making them a top choice for larger rooms. Think of it as trading some sweat for some serious square footage.
However, if steel beams feel a bit too “Avengers” for you, then you can always opt for a wood beam. It’s lighter, easier to handle, and gives off a charming rustic vibe. Remember to use the right type of wood – typically, you’ll want to use something like LVL (Laminated Veneer Lumber), which is engineered for high strength.
Once you’ve chosen your beam, you need to install it using king studs and jack studs. King studs are the long vertical pieces of lumber that extend from the floor to the ceiling, while jack studs sit inside the king studs and directly support the beam. Think of them as the beam’s loyal entourage.
In my experience, this part is where people can get a bit overwhelmed. But remember, Rome wasn’t built in a day, and your beam won’t be installed in a minute. So, take it slow, follow the guidelines, and you’ll have that beam up faster than you can say “beam me up, Scotty!”
Just remember – all this work is going to pay off when you’re sipping coffee in your new, open-plan paradise. Just remember to buy a smaller TV for the big reveal – we don’t want to block the view now, do we?
“Home, Sweet (Stable) Home”: Securing Your Home’s Structural Integrity
Congratulations! You’ve made it through the gauntlet of wall removal and beam installation. You’ve tackled challenges, flexed those DIY muscles, and probably learned a few new colorful phrases. But like any good movie, we’re not quite ready to roll the credits. We need to make sure that your hard work has paid off and that your home is as structurally sound as it is stunning.
“Better Safe than Sorry”: Confirming Your Home’s Stability
So, you’ve rolled up your sleeves, summoned your inner Tim “The Tool Man” Taylor, and removed that pesky load-bearing wall. Great job! But don’t pop the champagne just yet. It’s time to make sure your home is still playing by the laws of physics. Trust me, you don’t want to discover any “oopsies” after your victory lap.
Ensuring your home’s structural integrity is like a high-stakes game of Jenga. It’s all about maintaining the balance and understanding the weight distribution. And, unlike in Jenga, the stakes here are your home, not just your pride at the next family game night.
To verify the stability of your structure, you need to understand the load path. This is how the weight of your structure is transferred from the roof, through the walls, and down into the ground. Kind of like a game of tag, but with weight instead of awkwardly running kids.
Inspect the walls, floor, and roof for signs of stress. Look out for cracks in the walls, sagging in the roof, or uneven floors. If you spot any of these, you might need to call in the cavalry (also known as a professional structural engineer). There’s no shame in calling for reinforcements.
Don’t forget to check the new beam for any signs of stress or buckling. Remember, that beam is now doing the heavy lifting and needs to be in peak performance mode. In my experience, taking the time to verify this can save you from a lot of headaches (and potential property damage) down the line.
And finally, if everything checks out, take a moment to pat yourself on the back. You’ve just completed a major home renovation project. Now, go enjoy that newly opened space, put your feet up, and show off your handiwork. You’ve earned it!
“Reimagining Spaces”: Transforming Your Floor Plan
Imagine this: you step through your front door and see a wide, open space, allowing for easy flow between your living room, dining room, and kitchen. A world of possibilities just opened up, all because you made the daring decision to take down a load-bearing wall. But how does removing a wall impact different rooms and your floor plan? Grab your visionary goggles, because we’re about to dive into the world of open floor plans.
“Breathing Room”: Bringing an Open Floor Plan to Life
So, you’ve done the hard part. You’ve dusted off your work boots, pulled out that old sledgehammer, and said a tearful goodbye to your load-bearing wall. But what now? Well, my friend, welcome to the world of open floor plans. It’s kind of like Monopoly, but instead of going for Boardwalk, you’re looking at a combined living room-dining room that’s the talk of the town.
Removing a load-bearing wall changes the dynamics of your home. Suddenly, your individual rooms can breathe, expanding into a space that encourages interaction and connection. No more shouting from the kitchen to the living room during game night. You can now easily glide from one area to another, snacks in hand, without missing a beat.
The living room and dining room are often the two rooms most impacted by removing a load-bearing wall. By breaking down the barriers (literally), you can transform these spaces into a single, harmonious area. The space becomes more versatile, and the flow of light and traffic is significantly improved.
But it’s not just about aesthetic appeal. From a practical standpoint, an open floor plan can increase the value of your home. It’s a popular feature many new homeowners seek, so your future self might just thank you for this move.
I remember when I helped a friend remove a load-bearing wall between his kitchen and living room. The transformation was remarkable. What was once a cramped, isolated kitchen suddenly became a central hub of the house. His kids could now do homework at the kitchen island while he prepared dinner, fostering a sense of unity and connection.
But remember, it’s not just about the physical transformation. It’s about reimagining your space and how you live in it.
“Handing Over the Hammer”: Knowing When to Call the Pros
Picture this: you’re knee-deep in debris, your hands shaking from the vibrational feedback of the sledgehammer, and suddenly you find yourself asking, “Am I in over my head?” Well, it might be time to hang up your DIY hat. When it comes to removing load-bearing walls, there are moments when you need to step back and call in the cavalry of professionals. Let’s examine why enlisting the help of experts like a structural engineer, general contractor, and architectural technologist could be the game-changing decision your project needs.
“The Building Triumvirate”: Structural Engineer, General Contractor, and Architectural Technologist
I get it, you’re Captain DIY. You’ve watched every home improvement show and think Bob Villa has nothing on you. But when you’re dealing with the literal support system of your home, it might be time to bring in the pros. Sure, calling in an expert might seem like surrendering, but it’s not. It’s about doing the best for your home and your safety.
First up in our building triumvirate is the structural engineer. Think of them as the doctor for your home. They’re going to assess the situation, identify any potential risks, and prescribe the best solution to ensure your home remains structurally sound. They bring decades of training and experience to the table that can save you from costly mistakes down the line.
Next, we have the general contractor. They’re the orchestra conductor, keeping all parts of your construction symphony in harmony. They coordinate with different tradespeople, secure the necessary permits, and oversee the overall construction to make sure everything runs smoothly. In my experience, a good general contractor is worth their weight in gold, especially when it comes to complex projects like load-bearing wall removal.
Finally, there’s the architectural technologist. Ever wondered who can help turn your dream open-concept living room into a reality? That’s where they come in. Architectural technologists help you navigate building codes, draw up detailed plans, and can even help you visualize the finished project with 3D modeling.
Here’s the bottom line: you wouldn’t perform surgery on yourself, would you? (Unless you’re a trained surgeon, but that’s a different story altogether.) Similarly, removing a load-bearing wall isn’t just about wielding a sledgehammer with gusto. It’s a complex process that requires planning, precision, and professional know-how. So, when the situation calls for it, don’t be shy to pass the torch (or in this case, the hammer) to the pros.
XIII. “Because We’re All Curious”: Frequently Asked Questions (FAQs)
Got some burning questions? Don’t worry, you’re not alone. Here, we’ve compiled and answered some of the most common queries related to the removal of load-bearing walls. Let’s get right into it.
Q: Can you remove a load-bearing wall by yourself?
A: While it’s technically possible, it’s not recommended unless you have advanced DIY skills and experience in structural work. Also, even skilled DIYers should consult with a structural engineer to ensure safety.
Q: How much of a load-bearing wall can you remove?
A: The amount you can remove depends on the structure of your house and the load the wall is carrying. Always consult with a structural engineer before starting this type of work.
Q: Do you need a structural engineer to remove a load-bearing wall?
A: Yes, it’s highly recommended. A structural engineer can ensure the safety of the project and help you avoid costly or dangerous mistakes.
Q: Is it worth removing a load-bearing wall?
A: It can be if you want to open up space and create a more flexible floor plan. However, it’s important to consider the work, time, and cost involved in the process.
Q: What happens if you remove a load-bearing wall without support?
A: It could cause serious damage to your house, even leading to a collapse. That’s why temporary support structures are critical during the removal process.
Q: Can you replace a load-bearing wall with columns?
A: Yes, columns can provide the necessary support after removing a load-bearing wall. They need to be correctly positioned and installed to ensure they carry the load effectively.
Q: Are load-bearing walls thicker?
A: Not always. While load-bearing walls are often thicker than non-load-bearing walls, thickness isn’t a definitive indicator. It’s better to look at other structural elements like the placement of floor and ceiling joists.
Q: What is the minimum thickness of any load-bearing wall?
A: In general, a load-bearing wall should be at least 3.5 inches thick, but it varies based on factors like the material of the wall, the load it’s bearing, and local building codes.
Q: How do I know which walls are load-bearing?
A: Load-bearing walls are often located near the center of the house, and they’re aligned with major structural members like floor joists or roof trusses. However, the best bet is to consult with a professional.
Q: How long does it take to remove a load-bearing wall?
A: The process can take anywhere from several days to a week or more, depending on the complexity of the project and any additional work like installing new beams or re-routing electrical wiring.
Next Steps
Want to join others who are creating the most amazing home redesigns & renovations and get more tips, tricks and hacks on how to make your home the best it can be?
Join my brand new free private Facebook group, Remodel Reality to connect with other people like you to make your space the best!


