In this post, we’re delivering the definitive answer to the curious case of the ceiling-hung barn door. From the cozy corners of rustic farmhouses to the sleek interiors of modern apartments, we’re dissecting the reality of this gravity-defying home décor trend.
Can you hang a barn door from the ceiling?
Yes, you can hang a barn door from the ceiling using special ceiling-mount brackets and a specific barn door hardware kit. This process involves locating ceiling joists or installing a header board for mounting. Accurate measurements, following manufacturer’s instructions, and ensuring proper door clearance are critical for successful installation.
For some, knowing it’s possible may be enough to kick-start their next home improvement project. But for the rest of us that actually need to do it and the insatiably curious:
What is the secret to installing a ceiling-mounted barn door?
Can you mount any barn door to the ceiling?
How about low ceilings, can they accommodate a ceiling-hung barn door?
Do you need specific hardware for the installation?
Is there a magic formula for measuring the right height?
We will dive deep into these questions and many more. So, if you’re an avid DIYer, a home décor enthusiast, or simply someone who loves to challenge the status quo, get ready.
- Yes, you can hang a barn door from the ceiling with the appropriate hardware and installation method.
- It’s crucial to choose the right barn door hardware kit, including ceiling mount brackets, for a successful installation.
- Proper measurement of the door, ceiling height, and door placement is key to ensure the door operates smoothly.
- Low ceilings can still accommodate ceiling-mounted barn doors with the right adjustments and considerations.
- A solid header board or ceiling joists are necessary for securely anchoring the heavy weight of a barn door.
- The installation process may require additional tools such as a stud finder, drill, level, and possibly a step ladder.
- Following manufacturer’s instructions and taking safety precautions during installation is paramount for a secure, functional, and aesthetically pleasing outcome.
Heads up! Before we get too far along here, if you want to connect with other homeowners, DIYers, and builders and get more great ideas for your home to make your space the best join my free private Facebook group, Remodel Reality here.

Can You Hang A Barn Door From The Ceiling?
Are you dead set on installing a barn door in your home, but you’ve got low ceilings or you’re wondering if it’s even possible to hang it from the ceiling?
The question is simple:
Can you really hang a barn door from the ceiling?
So is the answer:
Absolutely.
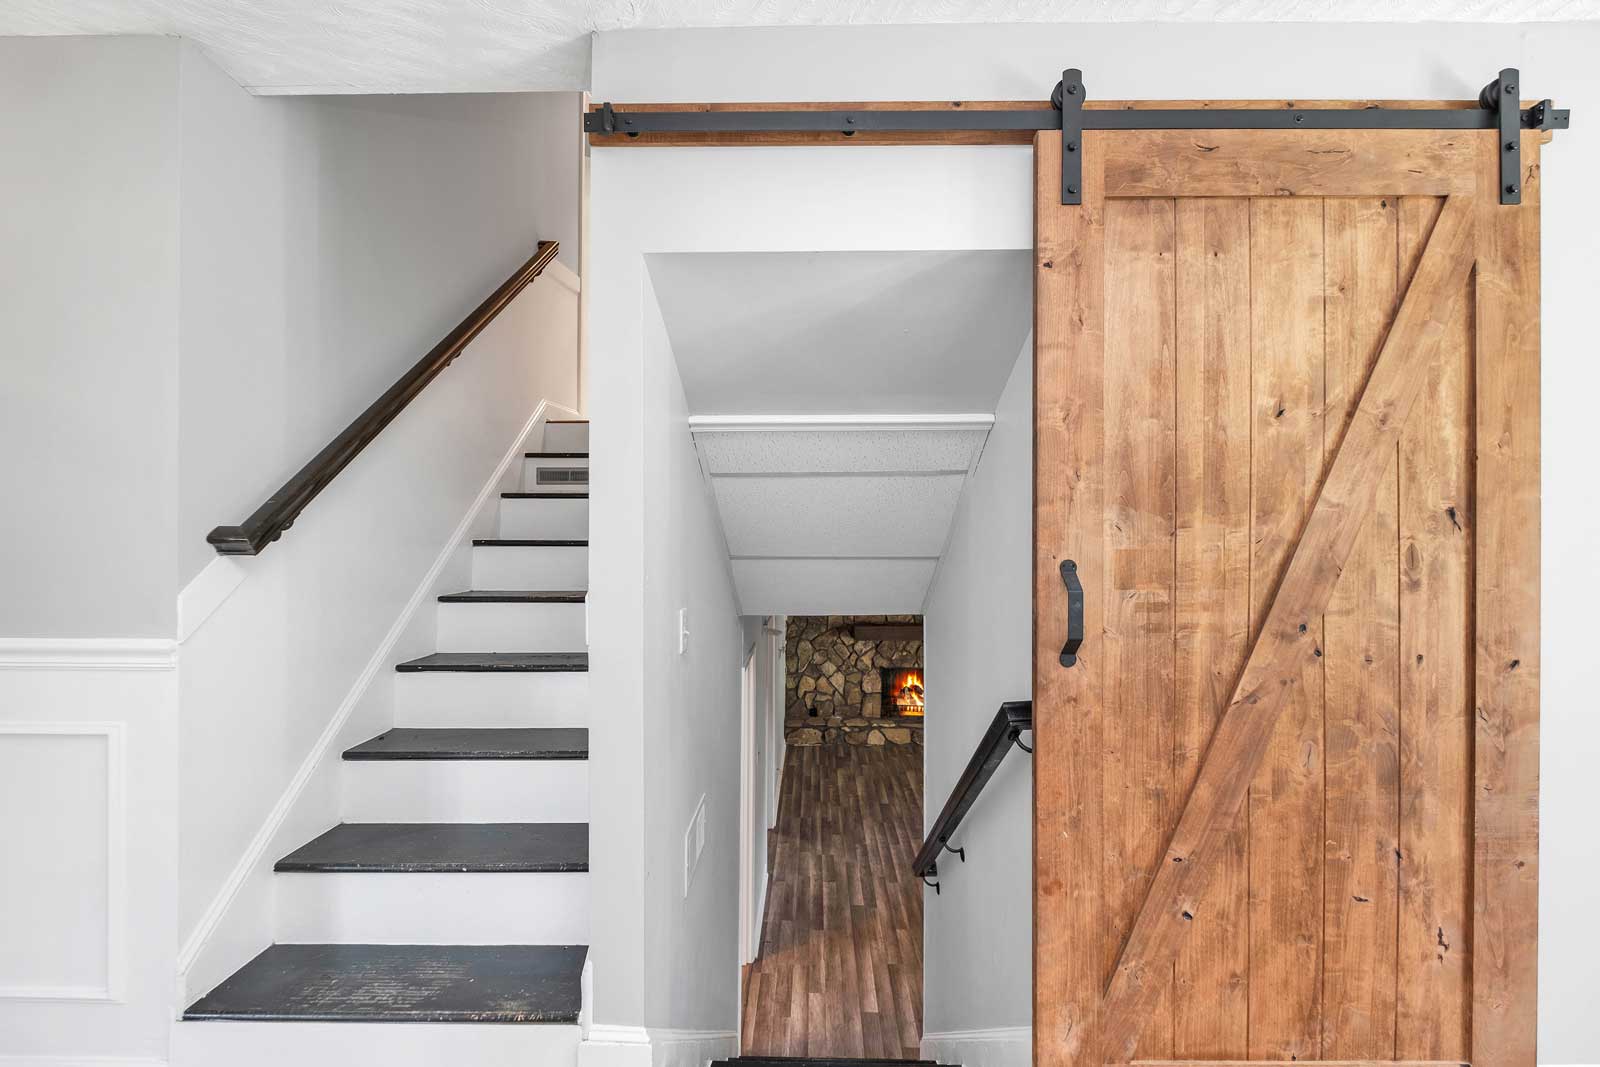
In fact, it can be a downright smart move when you’re dealing with limited wall space or aiming for a unique aesthetic. Hanging a barn door from the ceiling involves using a ceiling mount with a barn door track affixed to your ceiling joists, providing an alternative to the traditional wall-mounted method. With this arrangement, the door slides along a track suspended from the ceiling rather than being attached to a wall or door frame.
Defying Gravity: The Concept of Hanging Barn Doors from the Ceiling
Before you launch into this DIY project, you’ll want to understand the key players. This isn’t rocket science, but it sure feels like it when your door is defying gravity! (I’m kidding, of course – it’s actually pretty straightforward.)
The first character in our story is the ceiling mount. This piece of mounting hardware is key in suspending your barn door from the ceiling. The mount attaches to the ceiling joists – those hidden heroes providing support above our heads. If you’re dealing with low ceilings, no worries! Ceiling mounts are flexible enough to handle a variety of styles and ceiling heights.
Next, say hello to the barn door track. This is the metal track (think of it as a race track for your door) that the barn door slides along. You’ll need to consider the track lengths to ensure they fit your door opening and the width of the door. Remember, it’s always better to have a track that’s too long rather than one that’s too short – you don’t want your barn door making a grand escape!
The sliding door itself (your barn door) can be a single door, a double barn door, or even hollow-core doors depending on your preference. Remember, your door isn’t just functional, it’s a fashion statement too.
Finally, let’s not forget our supporting actors: the door guides. These handy tools keep the door from doing an impromptu swing dance (unless you’re into that sort of thing). A floor guide is traditionally used for this, but with a ceiling mount setup, you’ll use a wall-mounted door guide attached to the bottom of the door.
I remember one memorable project involved hanging a barn door in a beautiful, older home but it had some challenging architecture. The traditional door placement wouldn’t work due to limited wall space, and let’s face it, a pocket door didn’t suit the home’s style (not to mention all the demo that would have to be done to install a pocket door). The solution? A ceiling-mounted barn door. Not only did it fit the space perfectly, but it also added a modern twist to the classic style of the home.
Don’t let your wall space (or lack of it) restrict your design aspirations. Hanging a barn door from the ceiling might be the stylish and practical solution you’ve been looking for. The key is to choose the right size and right barn door hardware, plan carefully, and follow a step-by-step guide. Let’s slide right into the process, shall we?

Swinging Choices: Picking the Perfect Barn Door and Hardware
So you’ve decided to suspend a barn door from your ceiling. A daring choice! But now comes the hard part: picking the perfect barn door and the hardware that goes with it. Let’s dive into the ocean of choices and navigate the waves together, shall we?
Making Heads Turn: Choosing the Right Barn Door
Picking a barn door isn’t just about what looks nice on your Pinterest board. It’s about matching the size, style, and material to your specific needs and setup. Think of it as matchmaking for your home.
The first factor to consider is the size of the door. Whether you opt for a single door, double doors, or a double barn door, it’s crucial to ensure it fits your door opening perfectly. You’ll need to measure the width of your door and consider the clearance limit – don’t want your door whacking into a light switch or piece of furniture, do you? Remember, size matters, but so does proportion. A gigantic barn door might look great in a rustic loft but could overwhelm a quaint cottage kitchen.
The style of the door is next on our checklist. Do you prefer a modern, sleek door or something more rustic and traditional? Barn doors come in a variety of styles and materials, from hollow-core doors to barn door panels crafted from solid wood. The world of barn doors is your oyster – shuck it!
The Hardware Highway: What You Need for Installation
Now that you’ve picked out your dream door, it’s time to focus on the nuts and bolts (literally) of the situation. Here’s where your barn door hardware kit comes in.
You might be thinking, “Hardware kit? Can’t I just use some screws and call it a day?” If only it were that simple! There’s more to hanging a barn door than meets the eye.
The hardware kit contains all the necessary materials for installation. First up is the ceiling mount. This piece of mounting hardware will be attached to your ceiling joists. You’ll want to choose a mount that can support the weight of the barn door – no flimsy bits of plastic here!
The barn door track is another crucial component. This is where your door will glide, smooth as a hot knife through butter. Make sure it’s long enough for your door and fits with your chosen ceiling mount.
Finally, you’ll need a door guide. For a ceiling-mounted setup, you’ll use a wall-mounted door guide at the bottom of the door to prevent it from doing the cha-cha when you want it to waltz.
In my experience, choosing the right barn door and hardware can make or break the success of the installation. I remember a friend who bought a beautiful barn door, only to realize later that the hardware kit he’d chosen couldn’t support its weight. Let’s just say, it was quite the crashing surprise!
Choosing the right barn door and hardware might seem like a daunting task. But with careful consideration of size, style, and materials, and a thorough understanding of the necessary hardware, you’ll be one step closer to achieving that picture-perfect ceiling-mounted barn door.
Preparation is Key: Gearing Up for Your Barn Door Installation
You’ve got your eye-catching barn door. You’ve got your sturdy hardware kit. You’re itching to see that door slide along its track. But hold your horses! Before you dive headfirst into installation, let’s prep the ground. In this section, we’ll talk about the tools you need, the safety precautions to keep in mind, and how to assess your installation area.
Tool Time: The Essentials for Installation
Installing a barn door isn’t like changing a light bulb. You can’t just twist, click, and boom! You’re done. It needs a bit more finesse and, more importantly, the right set of tools.
At the very top of your shopping list should be a stud finder. Unless you have Superman’s X-ray vision, this tool is going to be your best bet at finding those elusive wall studs and ceiling joists. Why? That’s where your barn door’s weight will anchor. And trust me, you don’t want a barn door coming unhinged.
Next, have a look at your manufacturer’s instructions for any specialized tools you may need. You can think of this as your holy grail for this project. Not only will it list the necessary materials, but it will also serve as a step-by-step guide through the installation process.
And finally, remember to keep safety at the forefront. That means protective eyewear, gloves, and keeping your workspace clean and clutter-free. We’re installing a barn door here, not creating a trip-and-fall hazard!
Assessing the Area: It’s All About Location, Location, Location
Before you can go all Bob the Builder, you need to understand your installation area. We’re talking door opening, wall studs, and ceiling joists.
First, measure the door opening and the surrounding wall space. Make sure there’s enough room for the door to open and close comfortably. The last thing you want is a door that’s more of a wall (or vice versa).
Next, you’ll need to locate the wall studs and ceiling joists. This is where your trusty stud finder comes into play. You’ll attach the barn door hardware to these structures for support, so getting it right is critical.
In my experience, you can’t just eyeball these things. I once tried to mount a TV without using a stud finder, thinking I could judge where the studs were. Let’s just say, it didn’t end well for the TV (or the wall).
Lastly, consider your ceiling joists. These are the horizontal structures that will support your door’s weight from above. Make sure they’re strong enough to hold the weight of the barn door.
Preparation is key when installing a barn door. With the right tools, careful attention to safety, and a thorough assessment of your installation area, you’ll set the stage for a successful DIY project. Remember, the more you put into preparing, the smoother your installation process will be. So, get your tools ready, put on that protective gear, and let’s get started on transforming your space with that stunning barn door!

Let’s Do This: Your Step-by-Step Guide to a Standard Ceiling Mount Installation
Alright, it’s game time. You’ve got your tools. You’ve got your barn door. You’ve even found your wall studs and ceiling joists. Now, it’s time to get down to business. In this section, we’re going to walk through a step-by-step guide to installing your barn door using a standard ceiling mount. And remember, it’s not just about getting the door up. It’s about doing it right. So, let’s roll up those sleeves and get started.
From A to Z: Your Barn Door Installation Guide
- Start with your ceiling mount. This is going to be the main support for your barn door, so make sure it’s securely attached to the ceiling joists. Your stud finder should have helped you locate these.
- Align your barn door track with the ceiling mount. Keep in mind the width of your door and ensure there is enough space for the door to open and close comfortably.
- Drill starter holes in the designated stud locations. This will guide your screws and ensure they go in straight.
- Secure the barn door track to the ceiling mount using the provided screws. Make sure to follow the manufacturer’s instructions for this step.
- Attach the hanging hardware to the top of your door. Remember to measure and mark these spots carefully.
- Hang the door onto the track. This might require some help – barn doors can be heavy pieces!
- Install the floor guide. This will keep your barn door from swinging out and away from the wall.
- Lastly, attach your door handle, and voila! You’ve installed your barn door.
Crucial Considerations: It’s All in the Details
Now, I know what you’re thinking: “This seems straightforward. I can handle this.” And you’re right. But there are some special considerations to keep in mind to ensure a smooth installation process.
First, think about door placement. Ensure that your barn door won’t block any light switches or outlets when open. I once installed a barn door that, when open, completely covered a light switch. Let’s just say it made for some interesting fumbling in the dark.
Next, consider the width of the door. You want to make sure your door isn’t too wide for the wall space or too narrow for the doorway. Measure twice, cut once, right?
Lastly, consider the weight of the barn door. Make sure your ceiling joists and wall studs can support it. If the barn door is too heavy, it could cause structural damage. And trust me, nobody wants to deal with that kind of headache.
By following these steps and keeping these considerations in mind, you’ll be well on your way to a successful barn door installation. Remember, the devil is in the details. So take your time, measure carefully, and before you know it, you’ll have a stunning, smoothly operating barn door that adds style and functionality to your space.
“Give Me a Boost!” – Installing Your Barn Door with Additional Support
Sometimes, it’s the little things that trip us up. And then, there are times when it’s the heavier things that do. The standard installation of a barn door might not cut it if you’re dealing with heavier doors or weaker ceilings. In fact, these unique situations may call for some additional support. And in this chapter, I’ll cover the how, why, and when of adding that extra stability.
Weighing In: Recognizing the Need for Extra Support
Not all barn doors are created equal. And not all ceilings are as tough as they look. If you’ve got a hefty barn door or a ceiling that’s seen better days, you’re going to need additional support.
But how can you tell? Simple. Weigh your barn door. If it’s heavier than what your barn door hardware kit can handle, it’s time for reinforcements. If your ceiling creaks when you’re up there measuring or lacks the ceiling studs needed for secure installation, that’s another sign. Remember, your safety and the longevity of your DIY project is paramount. Better safe than sorry, right?
Got Your Back(er Board): A Step-By-Step Guide to Additional Support
Alright, it’s showtime. Let’s bolster that barn door. Here’s your step-by-step guide to installation with additional support, including the use of a backer board or extra brackets.
- Start with a solid backer board. This will distribute the weight of the barn door across a larger area, taking some of the load off your ceiling joists.
- Locate your ceiling studs and measure for placement of the backer board. Remember, the backer board needs to be wider than your door track to provide that much-needed additional support.
- Secure the backer board to the ceiling joists using heavy-duty screws. You may need a helping hand for this, especially with those heavy pieces.
- Attach your barn door track to the backer board. Make sure it’s centered and aligned with the doorway.
- From here, follow the standard installation guide. Hang your barn door on the track, install the floor guide, and attach your door handle.
One Final Note…
Now, an anecdote from my personal adventures in barn door installations. One time, while installing a hefty double barn door in an old house (you know, the ones where you’re scared to sneeze too hard?), I noticed that the ceiling was… less than robust. But with some additional support, not only did we manage to get those doors up and sliding smoothly, but the backer board also added an extra rustic touch to the decor. Talk about a win-win!
Don’t let a heavy door or a not-so-sturdy ceiling stand in the way of your barn door dreams. With a bit of extra support, you can install that door and ensure it stays up. So, go forth and conquer your DIY barn door installation, now equipped with the knowledge to handle even the heaviest of barn doors.
VII. “Mind Your Head!” – Barn Door Installation with Low Ceilings
What do you do when you have the perfect barn door, but your ceiling is more Hobbit hole than cathedral? You adapt, that’s what! In this chapter, we’ll tackle the challenges and solutions for installing barn doors in spaces with low ceilings. The ceiling height might limit you, but your creativity and ability to solve problems? Sky-high!
Low Ceiling Woes: Problems and Solutions
Dealing with low ceilings can be a bummer, but it’s far from a showstopper. The main challenge here? Clearance. Your door needs space to slide without giving your guests an unwanted “mind your head” moment.
To overcome this, you’ll need to focus on three factors: door height calculation, clearance limit, and the thickness of your door. The first step is to measure the height of your door opening and the space between the opening and the ceiling. The goal is to have enough room for the barn door track and the door itself.
What if there’s not enough space? Don’t worry. You can opt for a smaller door or even a double door design that divides the height between two doors.
A Low Down on the Installation: A Step-By-Step Guide
Now that we’ve covered the basics, let’s dive into the nitty-gritty. Here’s your step-by-step guide to overcoming the challenge of low ceilings in your barn door installation.
- Start by measuring the height from the floor to the ceiling. Subtract the height of the door opening. This will give you your clearance limit.
- Once you’ve got your clearance, it’s time to choose a suitable door. You might have to get a custom door made if standard doors are too tall. But hey, a custom door means it’ll be uniquely yours, right?
- With your door chosen, place the track as close to the ceiling as possible, ensuring you’ve left enough space for the door to slide easily.
- From here, proceed as usual with your installation. Attach the barn door track, hang the door, and secure the floor guide.
A low ceiling doesn’t mean you have to compromise on style. With a little creativity and careful calculations, you can install that barn door you’ve always wanted, regardless of your ceiling height. Don’t let a few inches rob you of the opportunity to have a stunning barn door in your home. It’s your home, make it work for you!
VIII. “Raise the Roof: Mastering Non-Standard Door Heights”
Ever looked at a door and thought, “That’s way too tall… or is it short?” You’re not alone. The world is full of doors of all shapes and sizes. And in the barn door installation world, we call them non-standard door heights. But don’t worry; this isn’t a problem. It’s an opportunity for customization. Buckle up, because in this chapter, we’ll unlock the secrets of handling these non-standard heights and making them work for you!
Breaking the Mold: Understanding Non-Standard Door Heights
Non-standard door heights can be a pain in the neck (or a pain in the knee, depending on the door). But here’s the good news: they can also be a chance to show off your personality.
Before you start, you’ll need to do some door height calculation. This involves measuring the height of the door and the clearance needed above and below it. You’ll also need to consider the adjustable spacing – the wiggle room that you have for the door to move.
Tackling the Giants (and the Pipsqueaks): A Step-By-Step Guide
Navigating the waters of non-standard door heights can seem tricky. But with the right process, it’s a breeze. Ready for your step-by-step guide? Let’s go.
- Measure the height of your door and the height of your door opening. The difference between the two is your adjustable spacing.
- Find your stud locations in the wall using a stud finder. This is where you’ll attach the mounting hardware. You might need to adjust this based on your door height.
- Mount the barn door track at the appropriate height. Keep in mind; you’ll need to leave some space between the top of the door and the track.
- Hang the door and check the clearance at the top and bottom. Adjust if necessary.
- Complete the installation by attaching the door handle and adjusting the floor guide.
Remember that house with the low ceilings I told you about? Well, that wasn’t the end of it. The homeowner had another surprise for me – a beautifully crafted, extra-tall barn door she wanted to install as a statement piece. With some quick calculations and a bit of creative hardware placement, we managed to hang that towering beauty without a hitch. And it looked fantastic, if I do say so myself!
In short, whether you’re dealing with towering giants or tiny pipsqueaks, non-standard door heights shouldn’t be a roadblock. With careful calculations and a little creativity, you can turn these unique challenges into customized solutions. So, go forth and install – the sky’s the limit! (Or the floor, if we’re talking about short doors).
Forever Young: Barn Door Maintenance and Adjustments Post-Installation
Remember the joy you felt when you successfully installed your barn door? That ‘aha’ moment when the final piece clicked into place? Now, it’s time to keep that spirit alive! Post-installation maintenance and adjustments are the key to prolonging your barn door’s life and ensuring it operates smoothly. Don’t worry; this isn’t rocket science. All you need is a gentle touch and an eye for detail. Ready to learn? Let’s roll!
Keep it Smooth: Your Guide to Barn Door Maintenance
Barn door maintenance is all about prevention and careful observation. Regular inspections can save you a world of hassle down the line.
First, keep an eye on the adjustable spacing. Over time, doors can sag or shift, and you may need to adjust the spacing to keep everything in line.
Second, clean your barn door regularly. Believe it or not, a soft cloth and some mild soap are all you need to keep your door looking its best. Stay away from harsh chemicals; they can damage the finish.
Dealing with Challenges: Privacy and Gaps
But what about the challenges that come up after the installation? Well, no door is perfect, but with a few tricks up your sleeve, you can handle these like a pro.
Take privacy, for example. How can you ensure that your barn doors allow for privacy? It’s all about placement and adding a few extra accessories. A lock or latch can go a long way in giving you and your family peace of mind.
And then there’s that pesky gap between the barn door and wall. While this gap is necessary for the door to slide smoothly, too large a gap can be a visual distraction. The solution? Consider adding a door guide at the bottom to help keep the door closer to the wall.
I remember installing a beautiful, modern-style barn door for a client. Weeks after the installation, he called me in a panic – the door was starting to squeak! When I got there, I found that all it needed was a bit of lubrication on the track. A five-minute fix, and the door was good as new. So, the lesson here is: don’t panic! Most post-installation challenges are a lot easier to handle than you might think.
After installation, barn door maintenance is just as important as the installation process itself. Keeping your eye on a few key areas like adjustable spacing, cleaning, and potential issues like privacy and gaps can keep your door looking and functioning like new for years to come. So don’t rest on your laurels just yet; the journey continues even after the installation is complete!
The Extra Mile: Special Considerations for Your Barn Door Installation
You’ve come a long way, and you’re almost at the finish line. But just like running a marathon, it’s the last mile that’s the trickiest. That’s where you’ll face those pesky special considerations that can make or break your barn door installation. But don’t sweat it. With a bit of careful planning and foresight, you’ll be crossing that finish line with ease.
Room-Specific Installations: Living Room and Bathroom Door
Ever wondered if you could add a barn door to your living room or as your bathroom door? The answer is an unequivocal ‘yes’. But each room comes with its own unique set of considerations.
For a living room, you might want a door that adds a design element. Perhaps a door with glass panels for a touch of elegance or a pop of color to brighten the room? Now for the bathroom, privacy becomes paramount. You’d want a door that ensures you can sing in the shower without a worry!
Privacy Matters: Ensuring Your Barn Doors Allow for Privacy
Speaking of privacy, it’s a valid concern when installing barn doors. After all, nobody wants an unexpected audience during a private moment. Luckily, barn doors allow for privacy just as well as traditional doors. You just need to consider adding a door handle with a lock feature. Simple, yet effective.
Thickness Matters: Handling Different Door Thickness
What about various door thickness? Well, the beauty of barn doors is that they can accommodate a door of any thickness. Thin, thick, or anything in-between, there’s hardware available for all. The key is to choose the right hardware for your specific door thickness.
I remember when a friend decided to install a particularly thick, heavy barn door. It was beautiful, sure, but he hadn’t considered the weight. The door kept falling off the track! Finally, we found a heavy-duty hardware kit designed for thicker doors. Crisis averted.
Comparing Barn Doors to Other Types of Doors
Finally, how do barn doors stack up against traditional doors, pocket doors, and hinged doors? Each door type has its pros and cons.
A barn door offers a unique aesthetic and can be a real space-saver. Traditional doors, on the other hand, are the classic choice, perfect for those who prefer to keep things straightforward. Pocket doors can disappear entirely into the wall, saving even more space than barn doors. But they can be challenging to install and may require more substantial construction work.
Choosing between these door types ultimately depends on your personal preference, available space, and the room’s specific needs.
Just remember: don’t be afraid of these special considerations. Embrace them! They’re what make your barn door unique to your home and your style. With a little extra effort, you can customize your barn door to perfectly suit your needs. Now, isn’t that worth going the extra mile?
The Open Door Policy: Alternatives to Ceiling-Mounted Barn Doors
So, you’ve been wooed by the charm of barn doors, but you’re not quite sure about the ceiling mount. Or perhaps, the structure of your home doesn’t allow for it. Fret not! The universe of doors is vast and varied, with many enticing options to explore. So, buckle up, my friend. It’s time to take a whirlwind tour of some of the top alternatives to ceiling-mounted barn doors.
The Door Dance: Swinging Doors and Regular Sliding Barn Doors
First up, let’s talk about the swinging door. A classic, you might say. These doors are just like your everyday doors, but they come with a fun twist—they swing both ways. Great for kitchens or where hands are often full, these doors add charm without the extra hardware requirements of barn doors.
Next up, we have the regular sliding barn doors. These are the barn doors’ close cousins, who have decided to take the road less traveled—or rather, the track less hung. They are mounted to the wall, not the ceiling, offering that barn door aesthetic without requiring structural changes to your ceiling. They give you the same rustic charm, but with a twist!
Why Consider These Alternatives?
Each door type has its perks, and they could just be the right fit for your home.
Swinging doors are like the dancers of the door world. They move effortlessly, need less space, and add an element of vintage charm. Plus, they offer the convenience of both ways access. A bit like a polite butler who always steps aside just at the right moment.
Regular sliding barn doors, on the other hand, give you the best of both worlds: the look of barn doors, without the need for ceiling mounts. So, if your ceiling joists are saying ‘no way’ to a ceiling mount, this might be your answer.
And don’t forget the element of surprise. Everyone expects a barn door to slide from the ceiling. But a wall? Now, that’s a conversation starter!
Remember my cousin, Mike? He loved the barn door look, but his apartment landlord wasn’t too keen on him drilling into the ceiling. Mike’s solution? A regular sliding barn door. He got his barn door charm, and his landlord got a hole-free ceiling. Win-win!
Your Door, Your Choice
Choosing a door is like choosing a dance partner. It needs to fit your style, keep up with your pace, and blend seamlessly with your rhythm. Whether that’s a ceiling-mounted barn door, a classic swinging door, or a regular sliding barn door, is entirely up to you.
FAQ: Demystifying Door Dilemmas
Stuck in the labyrinth of barn door installation? Don’t sweat it! Let’s unravel those knots of confusion together as we address the most frequently asked questions in the realm of barn doors.
Q: Can a sliding door be attached at the ceiling?
A: Absolutely! A sliding door can be ceiling-mounted using the right barn door hardware kit. This is particularly helpful in homes with low ceilings or where wall space is at a premium. The key is to ensure that the ceiling joists can support the weight of the barn door.
Q: How high from the ceiling should a barn door be?
A: Generally, a barn door should hang about 2 inches off the floor. Therefore, the height from the ceiling will largely depend on your ceiling height and door size. You’ll need to account for the track, mounting hardware, and clearance above the door.
Q: How close to the wall can a barn door be?
A: With the right hardware, a barn door can slide quite close to the wall. However, do account for the necessary spacing to avoid the door handle or any other feature scraping the wall. The exact spacing may vary based on the thickness and style of your door.
Q: Do you need a board attached to the wall for a barn door?
A: If you’re installing a barn door, you’ll likely need a header board or backer board. This piece of wood, securely attached to the wall studs, provides a strong base for your barn door track and ensures the wall can support the door’s weight.
Q: Can you hang a barn door from the roof?
A: Technically, yes, but it’s more common and practical to hang a barn door from ceiling joists, not the roof. The ceiling mount approach allows the door to slide smoothly along a metal track installed on your ceiling.
Q: Can you install a barn door with a low ceiling?
A: Yes, you can. While barn doors usually require some clearance, there are low-profile tracks designed specifically for homes with low ceilings. The key is to get the right size door and hardware to fit your space.
Q: Does a barn door need a bottom track?
A: Not always. Some barn doors use a floor guide at the bottom to keep the door in place. However, other models may feature a bottom track. It really depends on the style and manufacturer’s instructions.
Q: How should barn doors be hung?
A: Barn doors should be hung on a track mounted either to the wall or ceiling. The door should slide smoothly and freely, with enough room to fully open and close without obstructions. Remember, the door needs to be wider than the door opening to cover it completely when closed.
Q: Does a barn door need to be wider than the opening?
A: Yes, for optimal privacy and aesthetics, a barn door should be wider than the door opening. As a rule of thumb, your barn door should be at least 1 to 2 inches wider on each side of the door opening.
Q: Do barn doors allow for privacy?
A: Barn doors can provide privacy, but they may not be as secure as traditional doors due to the gap between the barn door and the wall. However, choosing a door of the right size and style, and including locks or latches can boost privacy.
Q: Can you hang a barn door over a door frame?
A: Yes, you can hang a barn door over a door frame, but you’ll need to account for the door swing, door handle, and other factors. The barn door track should be installed securely into the wall studs or a header board to support the door’s weight.
Q: What are floor-to-ceiling doors called?
A: Floor-to-ceiling doors are often referred to as “pocket doors”. These doors slide into a recess in the wall, disappearing when fully open. They are great for saving space and maintaining a sleek, modern style.
Next Steps
Want to join others who are creating the most amazing home redesigns & renovations and get more tips, tricks and hacks on how to make your home the best it can be?
Join my brand new free private Facebook group, Remodel Reality to connect with other people like you to make your space the best!