Are you looking for a way to transform your drab and boring basement into a stylish and inviting space?
One of the easiest and most effective ways to accomplish this is by painting the ceiling. But with so many different types of basement ceilings, paint colors, and techniques to choose from, where do you even begin?
In this post, I’ll guide you through everything you need to know about painting a basement ceiling. From tips on choosing the right color and type of paint to techniques for painting around ductwork and electrical wires, you’ll have all the knowledge you need to create a stunning and functional basement space.
By the way – before we get too far along here, if you want to connect with other homeowners, DIYers, and builders and get more great ideas for your home to make your space the best join my free private Facebook group, Remodel Reality here.
 Revamp Your Basement with a Freshly Painted Ceiling
As an attentive homeowner, you know how important it is to keep your house looking its best. And one area that is often overlooked is the basement ceiling.
But did you know that painting your basement ceiling can actually make a big difference in the overall look and feel of your home?
Why Is Painting a Basement Ceiling Important?
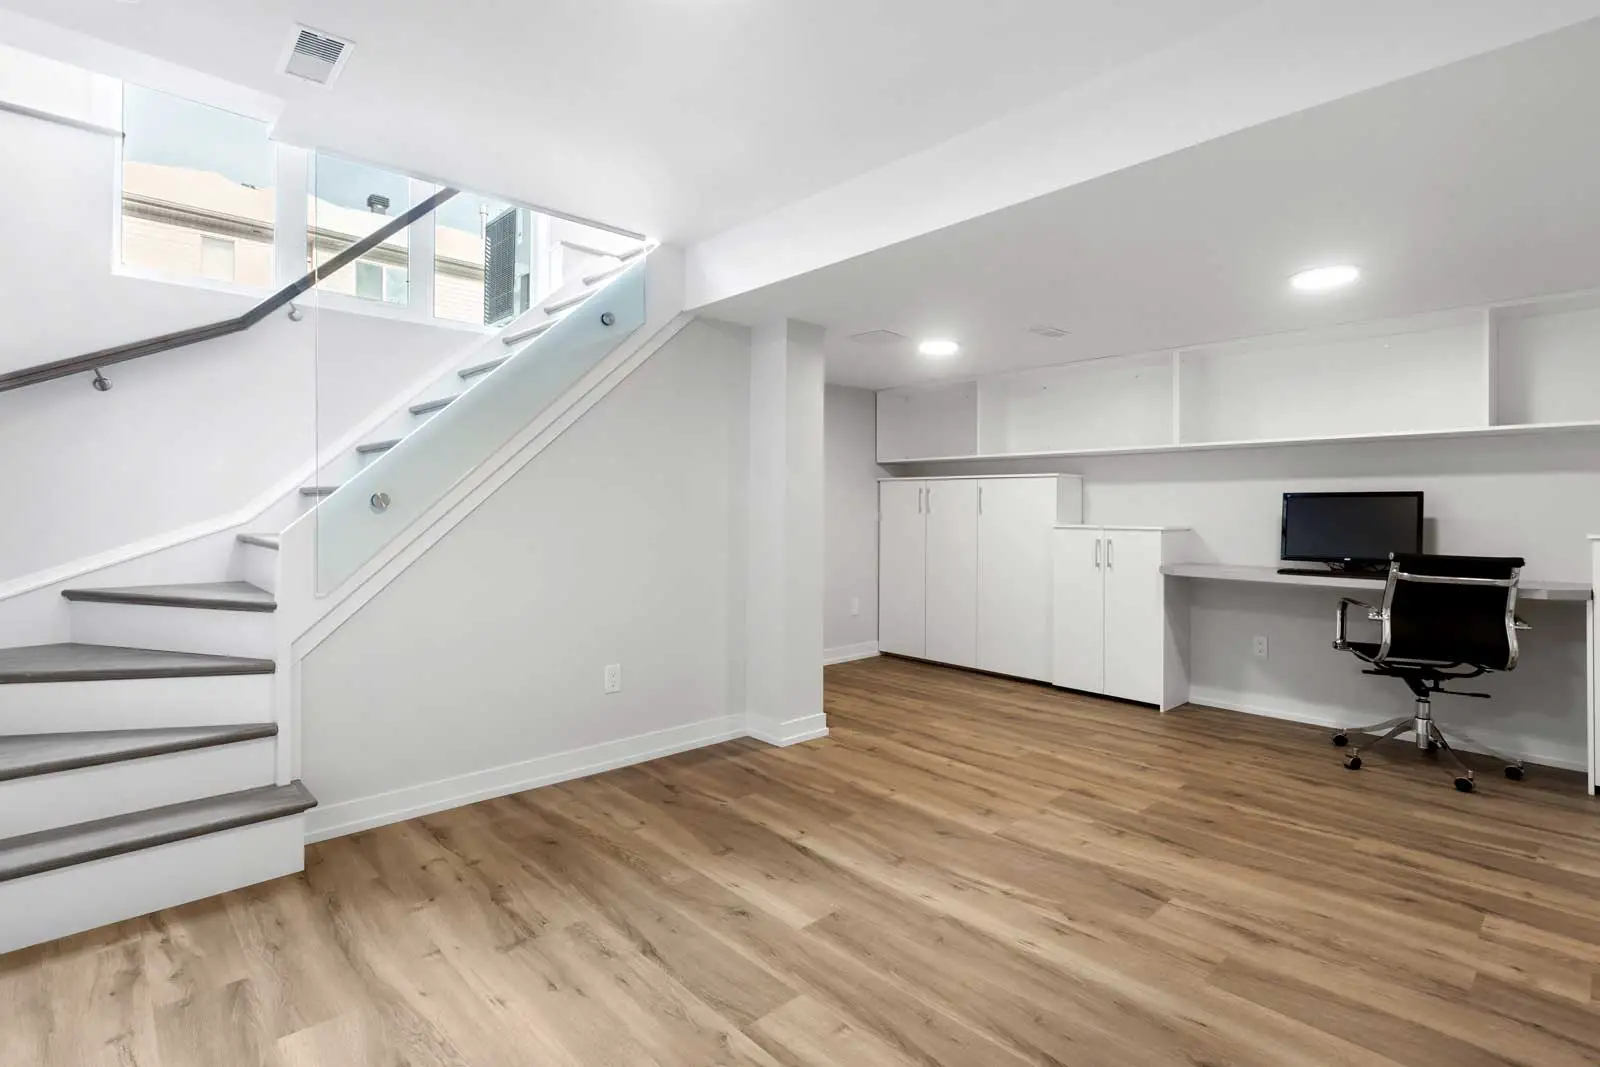
Painting a basement ceiling is a crucial step in finishing your basement and transforming it into a more inviting and polished living space. An unfinished ceiling can make your space look incomplete, uninviting, and unwelcoming. Painting your ceiling can give your basement a cohesive look that blends well with the rest of your home’s design.
Painting your basement ceiling is that it can help to conceal imperfections such as cracks, stains, or blemishes. By applying a fresh coat of paint, you can cover up these imperfections and create a smooth, flawless surface.
Another important reason to paint a basement ceiling is to protect and preserve any exposed wooden floor beams. These beams can be subject to damage from moisture, pests, and other factors, which can weaken the structure of your home over time. By painting the ceiling, you can create a protective barrier that can help to prevent damage and extend the life of your home’s wooden floor beams. In addition to providing protection, painting the ceiling can also enhance the overall appearance of the beams, making them a more attractive feature of your basement space.
The Benefits of Painting a Basement Ceiling
Painting your basement ceiling can make all the difference in transforming your space. Not only is it a budget and time-friendly option compared to drywalling, but the right color selection can also create an illusion of visual height, giving the illusion of a bigger, more open area. Here are some of the benefits you’ll receive from painting your basement ceiling:
- Aesthetic Upgrade: Aside from adding visual appeal, painting can add value to your home when it comes time to sell or rent out a space. Plus, you can choose whatever color palette suits you best for something that reflects your tastes.
- Illusion of Height: Choosing colors like white, light blue, mint green and other lighter shades will help give the illusion of extra height by reflecting more light than darker colors. This will make your basement look larger and brighter while feeling more inviting in the process.
- Cost and Time Savings: While drywalling can be expensive and tedious to install and finish, painting is far simpler, quicker and much less costly by comparison as no additional material is required other than paint itself.
- Easy Maintenance: If there’s ever any need for quick touch-ups or repairs down the line due to water damage or just wear and tear over time, a simple re-coat or refresher won’t require any major effort—making upkeep easy.
Painting your basement ceiling not only gives you that polished look but also brings added value to your home with minimal cost and effort spent along the way.
Factors to Consider Before Painting a Basement Ceiling
Before you start painting your basement ceiling, there are a few things to consider. First and foremost, think about what color you want to choose. Granted, this was probably the first thing that you thought about. My wife comes home with handfuls of paint samples to compare long before we even begin a painting project, so it’s a natural first step in the process. You can go with a lighter color like white, if you’re feeling particularly creative you can go with different colors black and gray are common options, but you can use any hue that you want to use – just remember that darker tones could make the room feel smaller while lighter shades may create an illusion of more space.
Next, decide which type of paint will be best for your project. Personally, I usually rely on the expert at the paint counter for this part. I tell them what I’m doing, and they make a recommendation for what I should use. Takes the decision making process out of my hands and then it’s just a matter of mixing it up. Latex paint with primer is usually a good choice – I’ve always had great results with it and it turns out with a high quality finish.
If using a sprayer is not something you want to tackle by yourself, one option is to hire a professional painter who has the right experience and equipment. This will help ensure that your project is completed properly and efficiently.
Now that we’ve covered the basics of why it’s important to paint your basement ceiling and the benefits you can enjoy, let’s dive into the step-by-step process of painting your basement ceiling.
 Preparing for the Perfect Basement Paint Job
Now that we’ve established the importance of painting your basement ceiling and the benefits it can bring, it’s time to get started on the actual process. But before we can start painting, we need to make sure we’re prepared for the job at hand. This means taking the time to properly clean and prep the room, choose the right paint and tools, and lay down a solid foundation with a layer of primer.
Cleaning the Ceiling
First things first, we need to clean the ceiling before painting. Dust, cobwebs, and other debris can interfere with the paint adhering to the surface (not to mention make your finished product look like crap), so it’s crucial to give it a thorough cleaning.
To clean the ceiling before painting, start by removing any loose debris using a vacuum with a brush attachment or a broom. A shop vac is a great tool for this job. This will help to remove dust, cobwebs, and other small particles that can accumulate on the surface. After vacuuming, use a damp cloth to wipe down the ceiling and remove any remaining dust or dirt.
Avoid using harsh cleaning products or abrasive materials that could damage the surface or make it unsuitable for applying paint. Of course, you’ll want to make sure the ceiling is completely dry before moving on to the next step of the painting process.
Prepping the Room
Next, it’s time to prep the room for painting.
Before you begin, make sure you cover the walls and floors with drop cloths or plastic sheeting to protect them from spills.
Move any pieces of furniture that can’t be moved, like shelving, bookcases and dressers away from the walls. Then use painter’s tape to mask off any areas that must remain paint-free, such as light fixtures or electrical outlets.
Also, it should go without saying, but make sure you’re wearing clothing (and shoes) that you’re not worried about getting paint on. Because it will happen. It will also get in your hair and on your skin so a hat and even a long-sleeve t-shirt may be a good idea.
If you’re using a sprayer, make sure you’ve got at least some kind of eye protection and a mask – you do not want to be breathing that stuff in.
Choosing the Right Paint
When it comes to painting your basement ceiling, choosing the right paint is crucial. You will want to opt for a flat or matte finish, as this will help minimize any imperfections in the ceiling and reduce glare. When selecting your paint, be sure to look for one that is specifically designed for ceilings; these paints are formulated with special elements that help prevent dripping and splattering.
Make sure the paint you select is high quality and suited for surfaces like concrete, drywall, wood, or any of the other materials you’ll be painting in your basement. If you’re not sure which type of paint to choose since there are numerous types available, talk to the person at the paint counter to get advice from a specialist to make sure you get the right kind.
| Type of Paint | Coverage Area (1 gallon) | Drying Time (1 gallon) | Coverage Area (5 gallons) | Drying Time (5 gallons) |
|---|---|---|---|---|
| Latex Paint | 250-400 sq. ft. | 2-4 hours | 1,250-2,000 sq. ft. | 8-12 hours |
| Acrylic Paint | 300-450 sq. ft. | 2-4 hours | 1,500-2,250 sq. ft. | 8-12 hours |
| Oil-Based Paint | 200-350 sq. ft. | 6-8 hours | 1,000-1,750 sq. ft. | 24-48 hours |
Using the Right Tools
When it comes to painting your ceiling, you absolutely have to have the right tools in order to get the job done properly.
When selecting the right tools for your project, you have a few options to consider. A paint sprayer can be used to quickly and efficiently apply your paint, however you have to keep in mind that paint sprayers can result in overspray (which means paint getting on places and things you didn’t intend for it to go). If you prefer greater control and precision over your application then a brush or paint roller may be more suitable for the job. Whatever tool you choose, make sure it is in good condition and the right size for the job at hand; this will make all the difference when it comes to achieving an even finish on your ceiling!
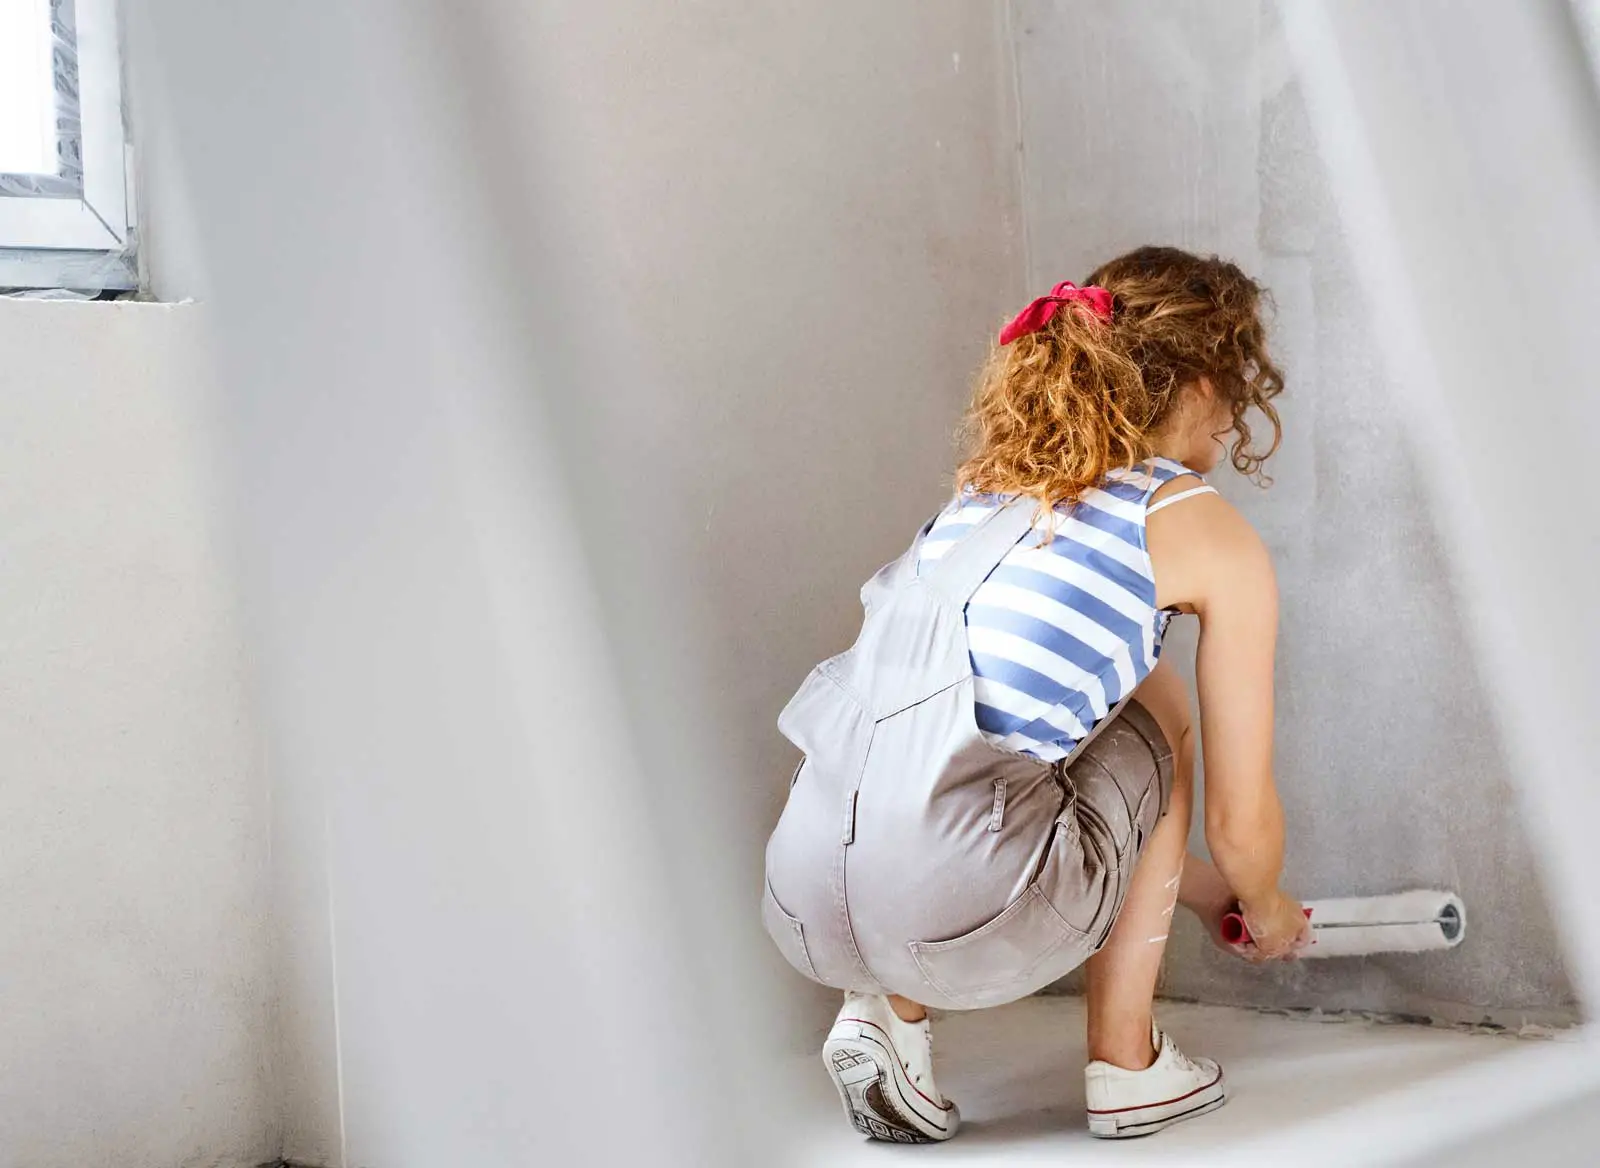
When using a paint roller or brush, use long strokes and keep a wet edge as you move across the ceiling. This will help create an even surface with no visible lines from where one stroke ends and another begins. When rolling out a room, begin painting from one corner of the ceiling and work towards a corner opposite from where you started in order to maintain an even coat; this is known as “cross-rolling”. For added artistic effect, you can use different techniques like dabbing or sponging paint onto your walls which can help create interesting patterns or textures on your walls based on how much pressure you apply.
The Importance of Primer
It’s absolutely vital to use a primer before you start painting your basement ceiling (or to at least use a paint and primer combo). Primer helps to create a smooth and even surface for the paint to adhere to, and can also help to cover up any stains or discolorations on the ceiling. Apply the primer with a brush or sprayer, and allow it to dry completely before you start painting.
With the area properly cleaned and prepped, and the right tools and materials on hand, you’re now ready to start painting your basement ceiling. In the next section, we’ll go over the steps to follow to get the job done right.
 Types of Basement Ceilings
If you’re planning to paint your basement ceiling, it’s important to understand the different types of ceilings that you may encounter. Here’s a breakdown of the most common types of basement ceilings:
| Type of Ceiling | Challenges Associated with Painting |
|---|---|
| Open Basement Ceiling | Difficult to paint around ductwork and pipes. |
| Unfinished Basement Ceiling | Additional imperfections, such as exposed wiring or pipes; rough or uneven surfaces |
| Drywall Ceiling | Uneven surfaces and cracks can be hard to hide, requiring additional drywall repair and paint coats. |
| Drop Ceiling | Panels may need to be removed for access, making painting tedious. |
| Ceiling Tiles | Different materials may require different types of paint or application. |
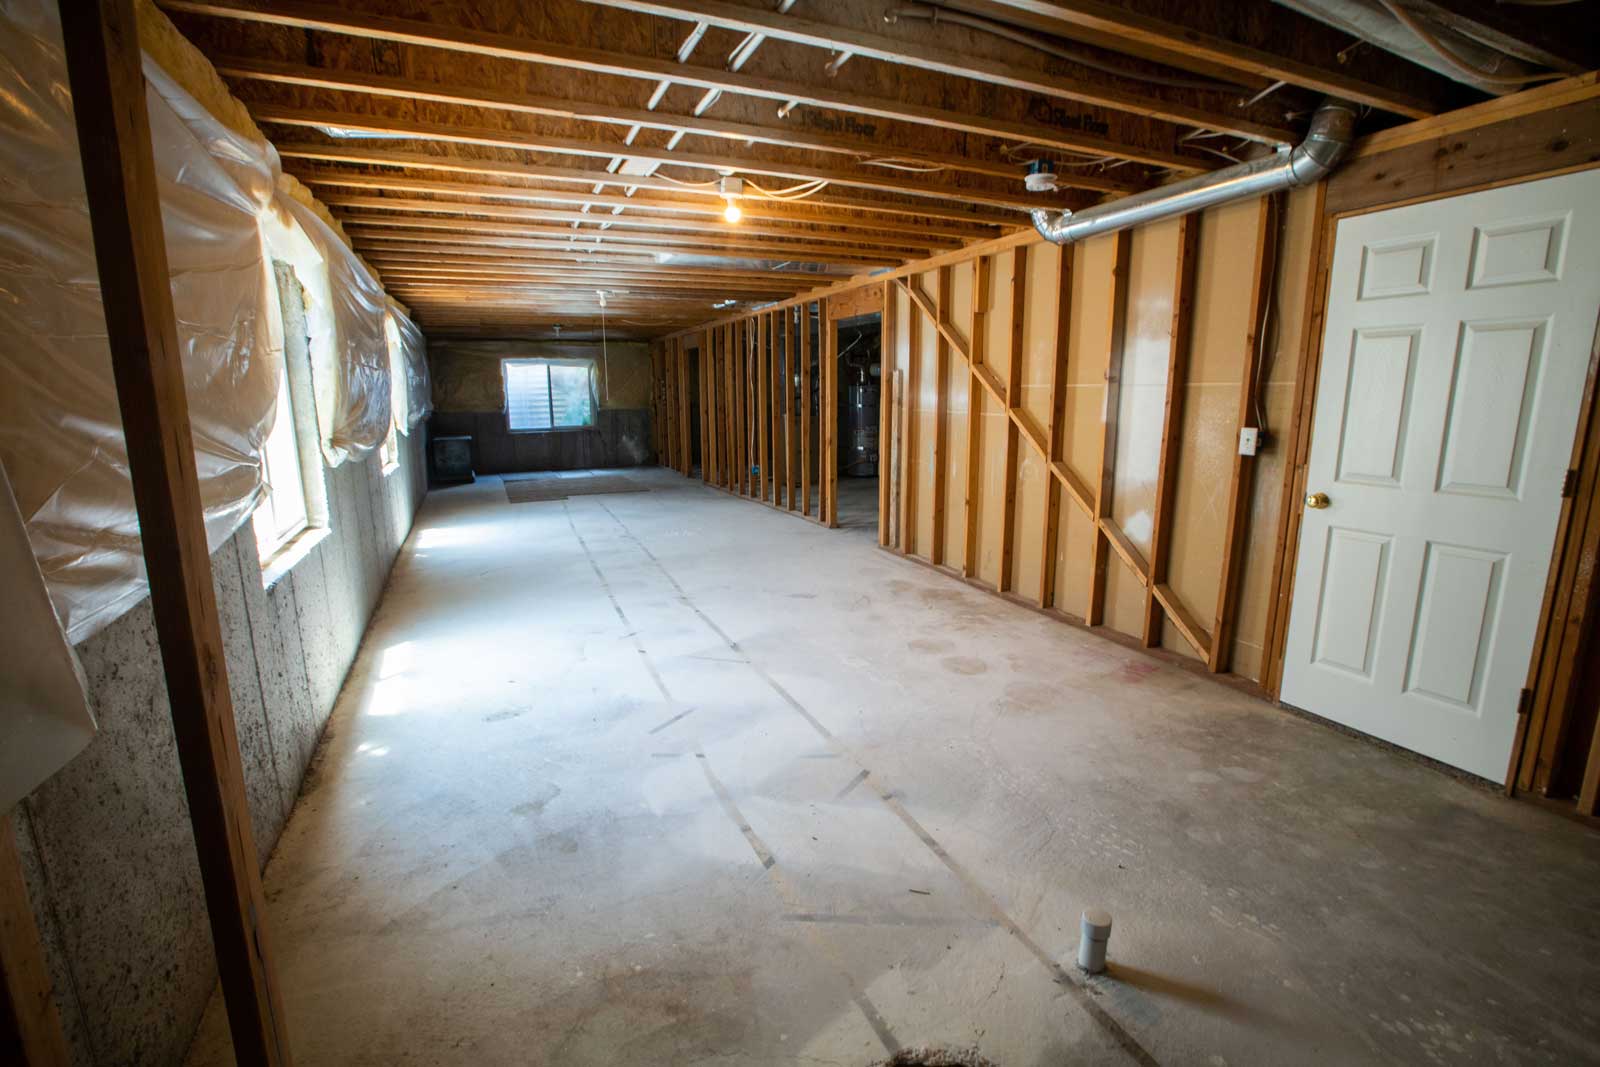
Open Basement Ceiling
Ceiling An open basement ceiling is an exposed ceiling that has no covering or finish. This type of ceiling is often found in industrial-style spaces or homes with a rustic aesthetic. When painting an open basement ceiling, it’s important to choose a paint color that complements the overall style of the space. Darker colors can create an industrial look, while lighter colors can make the space feel brighter and more open.
Unfinished Basement Ceiling
Ceiling An unfinished basement ceiling is similar to an open basement ceiling, but it may have more exposed electrical wires, ductwork, and pipes. When painting an unfinished basement ceiling, it’s important to be careful around these areas and use a small brush to paint around them. A flat finish paint can help hide imperfections and create a more cohesive look.
Drywall Ceiling
A drywall ceiling is a finished ceiling that has been covered with drywall. When painting a drywall ceiling, it’s important to use a roller or sprayer to ensure an even finish. Lighter colors can make the space feel larger and more open, while darker colors can create a cozy, intimate feel.
Drop Ceiling
A drop ceiling is a suspended ceiling that is often made up of ceiling tiles. When painting a drop ceiling, it’s important to choose a paint that is specifically designed for use on tiles. Painting a drop ceiling that has ceiling tiles can be more tricky because, more than likely, you’re going to need to remove the individual tiles to paint them individually.
Ceiling Tiles
Ceiling tiles are often found in older homes or buildings with a more traditional aesthetic. When painting ceiling tiles, it’s important to use a special primer that is designed for use on tiles. This will help the paint adhere better and create a more even finish. A light color can help make the space feel brighter and more open, while a darker color can create a more cozy, intimate feel.
 Techniques for Painting a Basement Ceiling
Now that you’ve prepped your basement ceiling, it’s time to start painting! Painting a basement ceiling can be a little challenging because of the unique challenges it presents – especially when it’s an unfinished ceiling. But with the right techniques, it can go quite smoothly, you just have to take your time and be patient (which is not a strength of mine).
Tips for painting an exposed or unfinished ceiling
If you have an exposed or unfinished ceiling, painting gets more complicated and it can be a bit more challenging. It’s important to use the right techniques to ensure the paint goes on evenly and looks great. Here are some best practices for painting an exposed ceiling:
- Start by cutting in around the edges of the ceiling with a brush. This will make the rest of the work so much easier. This helps you get a clean, straight line where the ceiling meets the walls.
- Once you’ve cut in around the edges, you can use a sprayer or roller to apply the paint to the rest of the ceiling.
- Make sure you use a high-quality paint that is designed for use on ceilings. This will help the paint go on evenly and provide good coverage.
- Use a light touch when painting. It’s better to do multiple light coats than one heavy coat.
The best way to use a sprayer or brush
If you’re using a sprayer to paint your basement ceiling, it’s important to use the right technique to ensure the paint goes on evenly. Here are some tips for using a sprayer:
- Hold the sprayer about 6-8 inches away from the ceiling.
- Move the sprayer in a smooth, even motion.
- Overlap each pass slightly to ensure even coverage.
- Use a steady hand and move at a consistent speed to avoid drips.
If you’re using a brush, it’s important to use the right size and type of brush. A 4-inch brush is a good size for most ceilings. Look for a brush that is designed for use on ceilings, as it will be easier to control and provide better coverage. When using a brush, it’s important to use a light touch and avoid overloading the brush with paint.
The importance of applying multiple coats of paint
When it comes to painting a basement ceiling, applying multiple coats of paint is essential for a professional finish. It’s best practice to apply at least two coats, allowing each coat to dry completely before applying the next one. This helps to ensure that all areas of the surface are properly and evenly covered with paint. Paint rollers or sprayers can be used to apply the multiple layers of paint, ensuring an even coverage by utilizing overlapping strokes in each layer.
Ideally, begin at one corner and work systematically across the ceiling area, paying close attention so as not to miss any spots along the way. To avoid creating drips or uneven lines while painting, use even pressure while moving your roller or sprayer in all directions.
Using plastic sheeting to protect the walls and floors
When you’re painting the basement ceiling, it’s important to protect the surrounding areas and floors from any potential paint spills or drips. The best way to do this is by using plastic sheeting to cover the surfaces that you don’t want painted. Use thick plastic sheeting for the most protection—you can find this in all kinds of different sizes and thicknesses at home improvement stores.
Don’t forget to securely tape the plastic sheeting down around all of the edges so that it doesn’t shift while you’re painting. Make sure that you press firmly when taping so that no paint gets underneath it. This will help ensure that your floors and walls won’t be splattered with paint while you’re working.
Once you’re done painting, carefully remove the plastic sheeting in order to reveal your freshly-painted surface free of overspray or drips!
Common mistakes to avoid while painting
While painting a basement ceiling can be a rewarding DIY project, there are some common mistakes to avoid.
These include not using enough paint, not adequately preparing the surface beforehand, and not providing enough time for each coat to dry before applying another one. This one is huge – so many people get impatient and want to apply that next coat too soon and end up with a goopy mess.
Make sure you use enough paint for the task; if you need more than one gallon, don’t skimp on quantity! You’ll need the left-over paint for touch-ups and potential future projects anyway so there’s nothing wrong with storing leftover paint.
It’s also wise to take the time to properly prepare the walls by sanding any imperfections or cleaning any dust away prior to starting your project. Additionally, give yourself plenty of time between coats to allow everything to dry properly.
If something does go wrong during your project, don’t fret – small errors can usually be fixed with simple touch-up paint and a bit of patience. That being said, you might want to check with a professional if your mistake is quite significant.
 Painting a Tricky Basement Ceiling: Tips and Tricks
So, you’ve decided to paint your basement ceiling, but now you’re faced with some unique challenges that come with the task. Whether you have a low ceiling or lots of ductwork to navigate around, with the right strategies and tips, you can tackle these obstacles and achieve a beautifully painted ceiling.
Strategies for Painting a Basement Ceiling with Low Ceilings Height or Ductwork
Painting a basement ceiling that has a low height or lots of ductwork can seem like a difficult task. But with the right tools and techniques, you can complete the job in no time. First, you’ll want to use a sprayer rather than a brush or roller as this will make it easier to reach tight spots. Don’t forget to also place drop cloths around the room to protect your floors and furniture from spilling paint.
Painting around pipes or ductwork can be challenging to say the least. That’s why it’s important to take your time and be patient.
Use a small brush to cut in any edges and then switch to either a roller or sprayer for the rest of the area where you can. While this may take extra time, the end result will be worth it. Make sure to also cover nearby walls with painter’s tape before beginning so that they aren’t affected by over-spray while painting your ceiling.
Dealing with an Old or Historic Home
If you’re dealing with an old or historic home, painting the basement ceiling involves some extra considerations. Before you start, it’s important to make sure that the surface of the ceiling is ready to be painted. If your house was built before 1978, you should test for lead-based paint and use a paint product that meets federal safety guidelines.
Another key factor to think about is the style and architecture of your house. You want to choose a color and finish that complements the design while still preserving any unique features, like exposed brick or ornate moldings, which are common on old, historic homes. A professional paint consultant or interior designer can help you select the right colors and finishes for your home.
When actually painting the ceiling in an old or historic home, it might be necessary to use a brush instead of a roller in order to ensure complete coverage with accuracy and precision. Take your time with this task and pay attention to detail so that you will end up with a long-lasting finish that enhances the character of your house.
How to Clean Up After Painting
Once you’ve finished painting your basement ceiling, make sure to clean up properly. This is always the worst part; cleaning up after painting sucks. But it’s essential to take care of your tools and equipment and make sure that the area stays tidy. Start by wiping down your tools and equipment with a damp cloth to get rid of paint residue. Make sure to clean off the bristles of any brushes you used to ensure there is no dried paint left on them.
Afterwards, take down the drop cloths and dispose them in a proper manner. Vacuum or sweep any floors that may have collected dust or debris during the painting process. Make sure to thoroughly clean off any surfaces such as light fixtures or pipes that may have gotten splattered with paint.
An important step in looking after your tools and equipment is cleaning up after a session of painting – take these steps to ensure that everything remains in good condition when you’re done!
 How to Paint a Basement Ceiling: Tips and Tricks for a Beautiful Finish
We’ve just about covered everything, but I want to finish up by giving you a few more tips and tricks you can use to make your basement painting project a success:
Exposed Floor Joists and Electrical Wires
If your basement ceiling has exposed floor joists and electrical wires, you’ll want to take extra care when painting. Start by carefully inspecting the area to ensure there are no loose wires or other hazards. Use a small brush to paint around any wires or electrical components, and consider using a special primer to help the paint adhere to the metal.
Black Paint and Black Ceilings for an Industrial Look
For a more industrial look, consider painting your basement ceiling black. This can create a bold, dramatic look that is perfect for a modern or edgy space. However, keep in mind that painting a ceiling black can also make the space feel smaller and more closed-in, so this option is best for basements with high ceilings and lots of natural light.
Using Artificial Light and Natural Light
Lighting can have a big impact on the overall look and feel of your basement. To make the space feel brighter and more open, consider using a combination of artificial and natural light. Install recessed lighting in the ceiling to provide even illumination, and add floor lamps or table lamps to create cozy areas for reading or relaxing.
Creating an Industrial Feel with the Ceiling
If you’re looking to create an industrial feel in your basement, consider using a combination of exposed pipes, ductwork, and electrical wires. These elements can be painted black or left unfinished to create a raw, edgy look that is perfect for a modern space. Pair this with concrete floors and minimalist furnishings for a truly industrial look & feel.
Use Dry Fall Paint for High Ceilings
Dry fall painting, also known as “drop dry paint” is a special type of paint where the main benefit is the fast-drying additives that are added to the paint formula. This means that any overspray will dry quickly, allowing for quick and easy cleanup like with a shop vac.
Brightening Up the Basement with White Walls and Ceiling
If you’re looking to brighten up your basement, consider doing a white ceiling. This can create a clean, fresh look that is perfect for a variety of styles. Pair with colorful furnishings and accessories for a fun, playful space.
Additional Resources and Links
If you’re planning on painting your basement ceiling, you’ll need the right supplies and equipment. I’ve found that Home Depot and Lowe’s are both great places to start since they offer a comprehensive selection of painting supplies and knowledgeable staff who can help you find exactly what you need. They’ve saved me numerous times from making bad paint choices. Alternatively, you can also shop online at retailers such as Amazon and Wayfair where you can find an even wider range of products.
Apart from purchasing supplies and equipment, it’s also important to brush up on some guiding tips for the project itself. There are lots of blogs and websites out there with useful information about painting ceilings, so be sure to check them out for helpful advice about how to get the job done properly. Having the proper tools and knowledge will ensure that your project turns out looking just as good as a professional would achieve.
Related questions & FAQs
Q: How are ceiling tiles different from drop ceilings?
A: Ceiling tiles are a type of covering that can be used on a variety of ceiling types, including drop ceilings. Unlike drop ceilings, which typically consist of a metal grid system with individual tiles suspended within it, ceiling tiles are designed to be glued or nailed directly to the ceiling surface. Ceiling tiles come in a variety of materials, including foam, fiberboard, and metal, and can be designed to mimic the appearance of other ceiling types, such as tin or plaster.
Q: How is an unfinished basement ceiling different from an open basement ceiling?
A: An unfinished basement ceiling is a type of open basement ceiling that has exposed joists, pipes, and ductwork, but it has not been finished in any way. This means that it may have insulation or wiring exposed and could have rough, uneven surfaces. On the other hand, an open basement ceiling may have a more finished appearance, with smooth, painted surfaces and insulation and wiring that are covered. In essence, an unfinished basement ceiling is simply an open basement ceiling that has not been finished or covered in any way.
Q: What is dry fall paint?
A: Dry fall paint is a type of paint that is specifically designed to dry into a powder-like substance as it falls from the ceiling. This makes it easier to clean up and reduces the amount of mess during the painting process. Dry fall paint is often used in large commercial spaces or areas with high ceilings, where overspray from traditional paint can be difficult to manage.
Next Steps
Want to join others who are creating the most amazing home redesigns & renovations and get more tips, tricks and hacks on how to make your home the best it can be?
Join my brand new free private Facebook group, Remodel Reality to connect with other people like you to make your space the best!